

I actually had to type this all over again, since for some reason, the tab closed itself and removed everything I typed (not sure why drafts aren't saved). Either way, this is my first blog post, so sorry if this breaks any rules.
I recently created a 90GB Windows ISO, containing over 230 indexes, with all editions of Windows 7, 8.1, 10, and Server. This took me several years to make, especially since obtaining all of the ISO images is quite hard and time consuming to do. Actually creating the ISO was pretty difficult, and I will be going over the whole process I used and the end result.
There are a few reasons that this was difficult. The first one is that finding unmodified ISOs takes lots of time, especially since I had to go to sites in other countries and use torrents to obtain legitimate and unmodified ISO images. For the past few years, people have begun to distribute SVF files that let you convert one ISO into another one, meaning that you would only need one ISO to get all ISOs of a specific Windows version. However, Microsoft have recently begun targeting huge SVF repos, making various Windows ISOs much harder to find, under the reason of "unauthorized" distribution, even though the ISOs you get when using the SVF files are legitimate and match the ones from MSDN and MVS. A few ISOs are actually lost to time (a few of the Windows 10 1507 images luckily, like Education N VL) because of Microsoft taking down ISO and SVF hosts. This has required me to recreate them using steps online and Windows Utilities. Another reason is that actually storing all of the ISOs and extracted files requires a whole bunch of space, to the point that I almost ran out of space on my internal HDD and later had to use an 8TB external. The final reason is that even though I have an amazing PC, my internet is really slow (only 90 kilobytes a second maximum) which meant I had to rely off of the School WiFi and a friend's WiFi to get these images. Now with the difficulties out of the way, it's time to get to the actual process I used.
The first thing I would do is once I got the ISO images, I would extract them to their own folders, then using 3RD party tools, export the images inside the install.wim files to a custom WIM file. Now, you may think this is easy, but if you want to keep organization and consistency in a big ISO like this one, you have to export them in specific orders and do proper naming. In the ISO, I used the naming scheme below:
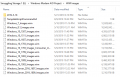
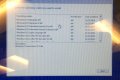
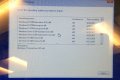
Anyways, after I would extract all of the images to a single WIM file, I would name the WIM file accordingly, put it into a folder, and make a backup of said image to another storage device. Below is a picture of all of the WIM images I created. Notice how they are neatly names. The folder at the top contains the updated WIM files with updates slipstreamed.
View attachment 167698
You can clearly see from the image above that the WIM files are very large, the smallest being 4GB and the largest being over 12GB! Now before I went to slipstream updates into the ISO, I decided to combine all of the WIM files into a single WIM so that I could test it out and see if this kind of project was even possible. At this point I had to switch over to an external 8TB HDD since I was almost out of space on my internal 2TB HDD.
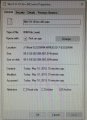
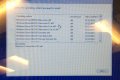
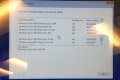
Combining all of the WIM files was really easy. All I had to do was use another 3rd party tool that allows me to combine WIM files into a single one. It took a little while, but the end result was a final WIM file that was 86.5GB in size.
View attachment 167700
You may notice the different directory and drive letter. This is because I had to start using my 8TB external drive to store the files since my 2TB internal drive was full. I also was planning on converting the WIM to an ESD to cut down on size, but unfortunately it was not done converting the almost 90GB monster by the time I had to go to school, so I was stuck with using the WIM file. Either way, since I had the completed WIM file ready, it was time to create the 90GB monster of an ISO!
The process for this was also pretty simple. All I had to do was extract a normal ISO, and swap out the normal install.wim with my modified WIM file. I then used another 3rd party tool to package all of the extracted files into a bootable ISO image that would work on VMs and on real hardware. While I did not take a picture, the ISO image was almost 90GB in size.
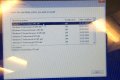
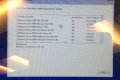
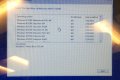
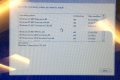
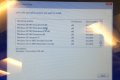
After the ISO was done, I created a new standard VM in VMWare Workstation Pro, pointed the program to my disk image, and waited as the 90GB image loaded and booted to the setup screen successfully. After that, the true test was seeing if the Windows Setup could even read the gigantic WIM file and 230+ images. After a few minutes of loading, the OS selection came up, with all indexes available! While there were small delays in selecting an OS and agreeing to the EULA, it is probably because my laptop is old and the ISO was being read from a 5400RPM drive.
View attachment 167701 View attachment 167702 View attachment 167703 View attachment 167704 View attachment 167705 View attachment 167706 View attachment 167707 View attachment 167708 View attachment 167709
While a few of the images show an empty space where an index should be, this is just a graphical bug common with the Windows Setup when scrolling, and every index was indeed there. To truly test the ISO, I installed Windows Server 2012 R2 from it and it went successfully.
Now that I explained how I made the image and the final result, it's time to go to the FAQ.
I recently created a 90GB Windows ISO, containing over 230 indexes, with all editions of Windows 7, 8.1, 10, and Server. This took me several years to make, especially since obtaining all of the ISO images is quite hard and time consuming to do. Actually creating the ISO was pretty difficult, and I will be going over the whole process I used and the end result.
There are a few reasons that this was difficult. The first one is that finding unmodified ISOs takes lots of time, especially since I had to go to sites in other countries and use torrents to obtain legitimate and unmodified ISO images. For the past few years, people have begun to distribute SVF files that let you convert one ISO into another one, meaning that you would only need one ISO to get all ISOs of a specific Windows version. However, Microsoft have recently begun targeting huge SVF repos, making various Windows ISOs much harder to find, under the reason of "unauthorized" distribution, even though the ISOs you get when using the SVF files are legitimate and match the ones from MSDN and MVS. A few ISOs are actually lost to time (a few of the Windows 10 1507 images luckily, like Education N VL) because of Microsoft taking down ISO and SVF hosts. This has required me to recreate them using steps online and Windows Utilities. Another reason is that actually storing all of the ISOs and extracted files requires a whole bunch of space, to the point that I almost ran out of space on my internal HDD and later had to use an 8TB external. The final reason is that even though I have an amazing PC, my internet is really slow (only 90 kilobytes a second maximum) which meant I had to rely off of the School WiFi and a friend's WiFi to get these images. Now with the difficulties out of the way, it's time to get to the actual process I used.
The first thing I would do is once I got the ISO images, I would extract them to their own folders, then using 3RD party tools, export the images inside the install.wim files to a custom WIM file. Now, you may think this is easy, but if you want to keep organization and consistency in a big ISO like this one, you have to export them in specific orders and do proper naming. In the ISO, I used the naming scheme below:
- <Product> <Edition> <Extra Flags> <SP Level> <Arch>
- Windows Server 2008 Datacenter Core VL SP1 x64
Anyways, after I would extract all of the images to a single WIM file, I would name the WIM file accordingly, put it into a folder, and make a backup of said image to another storage device. Below is a picture of all of the WIM images I created. Notice how they are neatly names. The folder at the top contains the updated WIM files with updates slipstreamed.
View attachment 167698
You can clearly see from the image above that the WIM files are very large, the smallest being 4GB and the largest being over 12GB! Now before I went to slipstream updates into the ISO, I decided to combine all of the WIM files into a single WIM so that I could test it out and see if this kind of project was even possible. At this point I had to switch over to an external 8TB HDD since I was almost out of space on my internal 2TB HDD.
Combining all of the WIM files was really easy. All I had to do was use another 3rd party tool that allows me to combine WIM files into a single one. It took a little while, but the end result was a final WIM file that was 86.5GB in size.
View attachment 167700
You may notice the different directory and drive letter. This is because I had to start using my 8TB external drive to store the files since my 2TB internal drive was full. I also was planning on converting the WIM to an ESD to cut down on size, but unfortunately it was not done converting the almost 90GB monster by the time I had to go to school, so I was stuck with using the WIM file. Either way, since I had the completed WIM file ready, it was time to create the 90GB monster of an ISO!
The process for this was also pretty simple. All I had to do was extract a normal ISO, and swap out the normal install.wim with my modified WIM file. I then used another 3rd party tool to package all of the extracted files into a bootable ISO image that would work on VMs and on real hardware. While I did not take a picture, the ISO image was almost 90GB in size.
After the ISO was done, I created a new standard VM in VMWare Workstation Pro, pointed the program to my disk image, and waited as the 90GB image loaded and booted to the setup screen successfully. After that, the true test was seeing if the Windows Setup could even read the gigantic WIM file and 230+ images. After a few minutes of loading, the OS selection came up, with all indexes available! While there were small delays in selecting an OS and agreeing to the EULA, it is probably because my laptop is old and the ISO was being read from a 5400RPM drive.
View attachment 167701 View attachment 167702 View attachment 167703 View attachment 167704 View attachment 167705 View attachment 167706 View attachment 167707 View attachment 167708 View attachment 167709
While a few of the images show an empty space where an index should be, this is just a graphical bug common with the Windows Setup when scrolling, and every index was indeed there. To truly test the ISO, I installed Windows Server 2012 R2 from it and it went successfully.
Now that I explained how I made the image and the final result, it's time to go to the FAQ.
- Is it practical for the average end-user to make? Probably not, since finding all of the needed ISOs is much harder than it was a few months ago, and you need lots of available storage, as well as a lot of patience.
- Is this ISO even useful? Absolutely! With an ISO like this, you will never have to fiddle around with loads of DVDs, Flash Drives, and ISO images ever again. You can install any edition of Windows 7, 8.1, 10 and Server.
- Why was Vista and 8 omitted? Windows Vista was not liked by a lot of people when it initially released. While it does not have many of the issues it had at launch, people would still probably be salty if I were to include it. Windows 8 is in the same boat, since 8.1 is a big improvement over 8 and has many features that 8 should have had at the start. Also, finding all of the Windows Vista and 8 ISOs would have made me take more time.
- Which images have updates slipstreamed and when? Almost all images have updated slipstreamed. The only images that don't have updated slipstreamed are the Windows 10 1507 images, due to a bug in the 1507 servicing stack causing offline servicing to fail with an error. The latest updates available as of 5-18-2019 were used when slipstreaming updates.
- How big is the folder with all of the files and programs used? Currently, over 1TB (actually 1.09TB, after offloading the Windows 7 files and ISOs to my external drive).
- How many indexes are actually in the ISO? I believe 232 currently, I would have to go back and check.
- Will this ever be released? Currently, the answer is probably not. This is because my internet is way too slow to upload this, and I would have to pay monthly for cloud storage just to host this. I could post this as a torrent, but I don't want to be targeted by Microsoft for "unquthorized" distribution. Also, you would need a 128GB flash drive just to use this ISO, and while they are cheap, I doubt people would want to purchase one. Maybe in the future when I get faster internet and access to a lot of cloud storage I will actually release this.
- W10UI
- WHD-W8.1UI
- WHD-W7UI
- WHDownloader
- WinToolkit
- gimagex
- decrypt-multi-release
- WIM2ESD
- SVF.ISO.CONVERTER (currently halted due to Microsoft removing SVF repos)
- SmartVersion
- DISM
- 7Zip


 . Saves on time, soap, water and money having to wash them.
