Before starting this tutorial you will need to download the files available at this link.
https://cdn.discordapp.com/attachme...4/654322707629867018/3DS_Img_and_Textures.rar
After unpacking the file you will come across four files, top.psd, bottom.psd, Editor.psd and Demo.psd.
The demo.psd file has all the procedures performed in this tutorial.
View attachment 85394
Open the file edit.psd this file allows to perform the procedure of creating the images, I left the desktop large, to facilitate the assembly process.
I'll be teaching you how to make a theme using a bottomless image along with a background landscape. The procedures explained in this tutorial can be used to create any type of theme, I will be explaining the methods you will need to know to create the montages in the images.
View attachment 85395
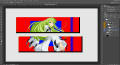
For starters I added a backgroundless image, you should add that image to the BGM layer, this layer serves to add the images that you will use in creating the theme.
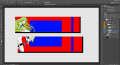
After adding the image I saw the need to resize the image and position it in the left corner of the screen, a part of the image was hidden this is normal, I will explain the procedure that will create the repeat loop in the image.
View attachment 85396
View attachment 85397
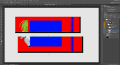
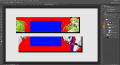
Before performing this procedure you must duplicate the image, only perform the duplication process after resizing and position the image in the desired place. After you duplicate the layer, rasterize the duplicate layer. Leave the shifth key pressed and click on the MASK layer cut mask, this procedure will perform a cut selection.Now select the duplicate layer and hit the Delete key.
View attachment 85398
View attachment 85399
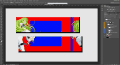
If you have performed the procedure correctly, the image will have an erased area, as shown in the image above. You should now position the image on the right side as shown in picture two.
https://cdn.discordapp.com/attachme...4/654322707629867018/3DS_Img_and_Textures.rar
After unpacking the file you will come across four files, top.psd, bottom.psd, Editor.psd and Demo.psd.
The demo.psd file has all the procedures performed in this tutorial.
View attachment 85394
Open the file edit.psd this file allows to perform the procedure of creating the images, I left the desktop large, to facilitate the assembly process.
I'll be teaching you how to make a theme using a bottomless image along with a background landscape. The procedures explained in this tutorial can be used to create any type of theme, I will be explaining the methods you will need to know to create the montages in the images.
View attachment 85395
For starters I added a backgroundless image, you should add that image to the BGM layer, this layer serves to add the images that you will use in creating the theme.
After adding the image I saw the need to resize the image and position it in the left corner of the screen, a part of the image was hidden this is normal, I will explain the procedure that will create the repeat loop in the image.
View attachment 85396
View attachment 85397
Before performing this procedure you must duplicate the image, only perform the duplication process after resizing and position the image in the desired place. After you duplicate the layer, rasterize the duplicate layer. Leave the shifth key pressed and click on the MASK layer cut mask, this procedure will perform a cut selection.Now select the duplicate layer and hit the Delete key.
View attachment 85398
View attachment 85399
If you have performed the procedure correctly, the image will have an erased area, as shown in the image above. You should now position the image on the right side as shown in picture two.
View attachment 85400
This procedure can be performed in the same way on the right side. This process will create the loop of repetition in the image that uses characters without background.
View attachment 85409
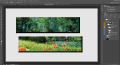
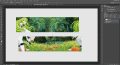
Now I'll explain how to add a landscape image, and how to create a repeat loop in the image. To start, I've added a landscape image to the BGM layer.
View attachment 85401
After adding the image in the BGM layer, I resized and positioned the image the way I wanted it.
View attachment 85402
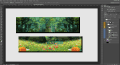
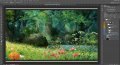
To perform the assembly procedure in a landscape, you need to duplicate the image layer, duplication should be made according to your need. After duplicating the layer to perform the assembly procedure, I applied a masking cutter on the duplicate layer, then I changed the position of the image on the upper screen.After performing the duplication procedure I activated the brush tool by pressing the letter B, and clicked on the cut mask gives image. With the cutter mask and the brush tool on, the brush color will have two color variations (white and black). If you paint the image with the selected cut mask, and use the black color, the brush will erase the image, if you use the white color will restore the area gives the image.
View attachment 85403
I deleted the bottom image with the black brush, then I changed the opacity of the brush, to erase specific points in the image, then I used the white color to restore specific points in the image. Always changing the opacity and properties of the brush. Performing these procedures I created the landscape gives top screen.
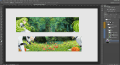
I duplicated the landscape layer again to be able to create the mount in the bottom image. Again I applied the cutter mask on the image, and I used the brush to perform the assembly procedure. I changed the direction of the image, then erased the image and restored the image using the brush in the cut mask.
View attachment 85404
View attachment 85405
View attachment 85406
Then I closed all layers through layer called Layer, with all the layers collected inside the Layer layer I duplicated the layer. Then I converted the image to an intelligent object, then I rasterized the layer.
View attachment 85407
After rasterizing the layer I activated the tabs by pressing Control +; , Using the guides I pressed the letter M to activate the cutting selection tool, then I used the guides to make the cut in the image.
View attachment 85408
With the image properly sliced, I opened the files top.psd and bottom.psd and I passed the slices to the files, to be able to create the top images is low.
If you have any questions, I have made available a demo.psd file, in this file you will be able to check all the procedures explained in this tutorial.
This procedure can be performed in the same way on the right side. This process will create the loop of repetition in the image that uses characters without background.
View attachment 85409
Now I'll explain how to add a landscape image, and how to create a repeat loop in the image. To start, I've added a landscape image to the BGM layer.
View attachment 85401
After adding the image in the BGM layer, I resized and positioned the image the way I wanted it.
View attachment 85402
To perform the assembly procedure in a landscape, you need to duplicate the image layer, duplication should be made according to your need. After duplicating the layer to perform the assembly procedure, I applied a masking cutter on the duplicate layer, then I changed the position of the image on the upper screen.After performing the duplication procedure I activated the brush tool by pressing the letter B, and clicked on the cut mask gives image. With the cutter mask and the brush tool on, the brush color will have two color variations (white and black). If you paint the image with the selected cut mask, and use the black color, the brush will erase the image, if you use the white color will restore the area gives the image.
View attachment 85403
I deleted the bottom image with the black brush, then I changed the opacity of the brush, to erase specific points in the image, then I used the white color to restore specific points in the image. Always changing the opacity and properties of the brush. Performing these procedures I created the landscape gives top screen.
I duplicated the landscape layer again to be able to create the mount in the bottom image. Again I applied the cutter mask on the image, and I used the brush to perform the assembly procedure. I changed the direction of the image, then erased the image and restored the image using the brush in the cut mask.
View attachment 85404
View attachment 85405
View attachment 85406
Then I closed all layers through layer called Layer, with all the layers collected inside the Layer layer I duplicated the layer. Then I converted the image to an intelligent object, then I rasterized the layer.
View attachment 85407
After rasterizing the layer I activated the tabs by pressing Control +; , Using the guides I pressed the letter M to activate the cutting selection tool, then I used the guides to make the cut in the image.
View attachment 85408
With the image properly sliced, I opened the files top.psd and bottom.psd and I passed the slices to the files, to be able to create the top images is low.
If you have any questions, I have made available a demo.psd file, in this file you will be able to check all the procedures explained in this tutorial.