

I've been meaning to make Kimchi for a while, and last month I decided to try it out.
I used the following recipe from a genuine South Korean:
- Ingredients:
I used 2 whole napa cabbages, about 1.54 kg or 3.4 lbs, you can use however much you can fit in the bowl or container you are using.
About a third of the original recipe size, adjusted the other ingredients to match.
For draining cabbage:
80ml salt or 93g (about 1/3 cup)
For rice porridge:
240ml water (about one cup)
40ml sweet rice flour, also called glutinous rice flour or sometimes powder (about 1/6 cup)
20ml sugar (1 tbsp + 1 tsp)
For spice mixture:
80ml garlic cloves, whole (a little over one whole garlic in my case), however I will use less the next time as it tends to leave a lingering pickled garlic taste in my mouth for a while afterwards, which isn't pleasant.
About 1 inch of ginger (I used more than the original recipe, as I love ginger)
One small onion chopped into big chunks. Or half a large.
80ml of fish sauce (about 1/3 cup)
180ml of Korean chili flakes (about 3/4 cup, the original recipe said 2 cups for spicy, 2.5 cups for very spicy, so I went halfway inbetween with 2.25 cups and adjusted for the smaller batch)
NO raw squid (no thank you)
Extra vegetables for flavor:
One large leek halved and roughly chopped (I used more than the original recipe, as I didn't want half a leek left in my fridge, and I like leek)
3 scallions roughly chopped
one medium carrot cut into matchsticks
one large daikon raddish cut into matchsticks (try to find a smaller one, this was just the smallest they had)
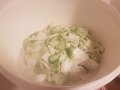
Let's start off by washing the cabbage, salting it and letting the moisture drain out.
View attachment 194519
View attachment 194518
Now it will sit for 2 hours under pressure to force more of the moisture to escape. The recipe did not say to do this but other recipes did, so I did it anyway.
View attachment 194517
While that's going, let's make the rice porridge.
Adding rice flour, and water to a pot.
View attachment 194516
After simmering for several minutes while stirring, adding the sugar.
View attachment 194515
After stirring for several more minutes I set it to cool. The rice porridge is completely optional, and only makes fermentation happen sooner and possibly affecting the flavor slightly.
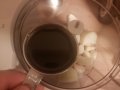
Next, the spice mixture.
Adding all spice mixture ingredients except for the chili flakes into a food processor.
View attachment 194514
That's a lot of fish sauce.
View attachment 194513
After blending for about a minute, I mixed together the spice mixture, rice porridge and chili flakes in a second bowl.
View attachment 194512
View attachment 194511
View attachment 194510
Here is our finished Kimchi spice mixture.
View attachment 194509
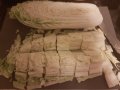
Time to chop all of the vegetables.
View attachment 194508
View attachment 194507
View attachment 194506
View attachment 194505
Let's mix them together with the spice mixture.
View attachment 194504
View attachment 194503
Now we wait.
Once cabbage had sat for 2 hours, I filled the bowl with water, rinsed and drained the cabbage 3 times, to get rid of most of the salt.
View attachment 194502
Draining thecabbage for 20 minutes.
View attachment 194501
After rinsing and drying the large bowl I moved the cabbage back, added the spice/vegetable mixture, and mixed everything well using my hands.
Instead of gloves like in the video, I just used transparent bread bags.
View attachment 194500
View attachment 194499
And finally, the finishing touches. Transfer into a suitable container if necessary. The bowl I am using has an airtight lid, so I didn't have to.
I pressed down firmly to get rid of air pockets and coat the cabbage as much as possible in the mixture.
View attachment 194498
Putting the lid on.
View attachment 194497
I let it sit at room temperature for 3 days before refrigerating. However depending on the recipe you're reading it will say anywhere from 1-5 days. It depends on how long you intend to keep it before finishing it all (as it will continue fermenting slowly in the fridge), and how sour you want it.
During this time, it's important to open the lid daily to let pressure out, have a taste to see how things are progressing, and press down to get rid of air bubbles that have formed from fermentation. A chopstick can assist in getting rid of air pockets.
After 3 days I felt like it was decently sour, so it was time to transfer it to another container which will actually fit in my fridge.


I let it cool in the refrigerator before consuming any of it, as I feel like fresh Kimchi needs to be chilled.
The amounts I provided make about 2.5 kg of Kimchi, you will need a very large bowl for the first steps involving the cabbage, and a large container with a lid for fermentation and storage.
A container that's about 3L is adequate for storage, but you may have some problems with overflowing during the fermentation process, which wastes a lot of good kimchi juice you can use in recipes. That's why I did the room temperature fermentation in a larger container, so I wouldn't lose any of those precious juices (as this was my second attempt, and the first attempt I lost a lot of the juices), and transferred some to a smaller container after the 3 days, instead of putting everything in one container.
Took me about 2.5 hours to make, with some waiting for the cabbage to drain.
That does not include the picture taking, which took about 30 min extra.
It's now about a month later, and I've consumed almost all of it. The very first batch (same size) I made as a test before taking these pictures on the second batch is long since gone too.
Most of it went into Samyang Spicy Chicken noodles (Stew type), it makes an excellent lunch, so tasty, but very hot, as it feels like the spicy Kimchi makes the Samyang noodles even spicier. I also tried a quick stir fry with Kimchi a couple weeks ago, but did not take any pictures. I tried Kimchi as a side with a couple other dishes as well.
Conclusion: Delicious, and just like how I remember it from Korean restaurants when I go to Singapore.
Need to make more soon, now that I'm almost out. I picked up a Daikon radish the other day, so a quick trip to the nearby grocery store to get the other vegetables, and I'm ready for round 3.
Stay tuned for Part 2, coming to a blog near you in the coming days!
I used the following recipe from a genuine South Korean:
- Ingredients:
I used 2 whole napa cabbages, about 1.54 kg or 3.4 lbs, you can use however much you can fit in the bowl or container you are using.
About a third of the original recipe size, adjusted the other ingredients to match.
For draining cabbage:
80ml salt or 93g (about 1/3 cup)
For rice porridge:
240ml water (about one cup)
40ml sweet rice flour, also called glutinous rice flour or sometimes powder (about 1/6 cup)
20ml sugar (1 tbsp + 1 tsp)
For spice mixture:
80ml garlic cloves, whole (a little over one whole garlic in my case), however I will use less the next time as it tends to leave a lingering pickled garlic taste in my mouth for a while afterwards, which isn't pleasant.
About 1 inch of ginger (I used more than the original recipe, as I love ginger)
One small onion chopped into big chunks. Or half a large.
80ml of fish sauce (about 1/3 cup)
180ml of Korean chili flakes (about 3/4 cup, the original recipe said 2 cups for spicy, 2.5 cups for very spicy, so I went halfway inbetween with 2.25 cups and adjusted for the smaller batch)
NO raw squid (no thank you)
Extra vegetables for flavor:
One large leek halved and roughly chopped (I used more than the original recipe, as I didn't want half a leek left in my fridge, and I like leek)
3 scallions roughly chopped
one medium carrot cut into matchsticks
one large daikon raddish cut into matchsticks (try to find a smaller one, this was just the smallest they had)
Let's start off by washing the cabbage, salting it and letting the moisture drain out.
View attachment 194519
View attachment 194518
Now it will sit for 2 hours under pressure to force more of the moisture to escape. The recipe did not say to do this but other recipes did, so I did it anyway.
View attachment 194517
While that's going, let's make the rice porridge.
Adding rice flour, and water to a pot.
View attachment 194516
After simmering for several minutes while stirring, adding the sugar.
View attachment 194515
After stirring for several more minutes I set it to cool. The rice porridge is completely optional, and only makes fermentation happen sooner and possibly affecting the flavor slightly.
Next, the spice mixture.
Adding all spice mixture ingredients except for the chili flakes into a food processor.
View attachment 194514
That's a lot of fish sauce.
View attachment 194513
After blending for about a minute, I mixed together the spice mixture, rice porridge and chili flakes in a second bowl.
View attachment 194512
View attachment 194511
View attachment 194510
Here is our finished Kimchi spice mixture.
View attachment 194509
Time to chop all of the vegetables.
View attachment 194508
View attachment 194507
View attachment 194506
View attachment 194505
Let's mix them together with the spice mixture.
View attachment 194504
View attachment 194503
Now we wait.
Once cabbage had sat for 2 hours, I filled the bowl with water, rinsed and drained the cabbage 3 times, to get rid of most of the salt.
View attachment 194502
Draining thecabbage for 20 minutes.
View attachment 194501
After rinsing and drying the large bowl I moved the cabbage back, added the spice/vegetable mixture, and mixed everything well using my hands.
Instead of gloves like in the video, I just used transparent bread bags.
View attachment 194500
View attachment 194499
And finally, the finishing touches. Transfer into a suitable container if necessary. The bowl I am using has an airtight lid, so I didn't have to.
I pressed down firmly to get rid of air pockets and coat the cabbage as much as possible in the mixture.
View attachment 194498
Putting the lid on.
View attachment 194497
I let it sit at room temperature for 3 days before refrigerating. However depending on the recipe you're reading it will say anywhere from 1-5 days. It depends on how long you intend to keep it before finishing it all (as it will continue fermenting slowly in the fridge), and how sour you want it.
During this time, it's important to open the lid daily to let pressure out, have a taste to see how things are progressing, and press down to get rid of air bubbles that have formed from fermentation. A chopstick can assist in getting rid of air pockets.
After 3 days I felt like it was decently sour, so it was time to transfer it to another container which will actually fit in my fridge.
I let it cool in the refrigerator before consuming any of it, as I feel like fresh Kimchi needs to be chilled.
The amounts I provided make about 2.5 kg of Kimchi, you will need a very large bowl for the first steps involving the cabbage, and a large container with a lid for fermentation and storage.
A container that's about 3L is adequate for storage, but you may have some problems with overflowing during the fermentation process, which wastes a lot of good kimchi juice you can use in recipes. That's why I did the room temperature fermentation in a larger container, so I wouldn't lose any of those precious juices (as this was my second attempt, and the first attempt I lost a lot of the juices), and transferred some to a smaller container after the 3 days, instead of putting everything in one container.
Took me about 2.5 hours to make, with some waiting for the cabbage to drain.
That does not include the picture taking, which took about 30 min extra.
It's now about a month later, and I've consumed almost all of it. The very first batch (same size) I made as a test before taking these pictures on the second batch is long since gone too.
Most of it went into Samyang Spicy Chicken noodles (Stew type), it makes an excellent lunch, so tasty, but very hot, as it feels like the spicy Kimchi makes the Samyang noodles even spicier. I also tried a quick stir fry with Kimchi a couple weeks ago, but did not take any pictures. I tried Kimchi as a side with a couple other dishes as well.
Conclusion: Delicious, and just like how I remember it from Korean restaurants when I go to Singapore.
Need to make more soon, now that I'm almost out. I picked up a Daikon radish the other day, so a quick trip to the nearby grocery store to get the other vegetables, and I'm ready for round 3.
Stay tuned for Part 2, coming to a blog near you in the coming days!


 Or others