Review cover 
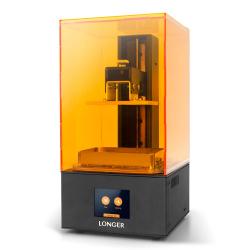
Orange 10 SLA 3D Printer (Hardware)
User Review

Product Information:

The Orange 10 is a new SLA printer that boasts some pretty awesome features for a small price tag. Does it match up to the hype that other Youtube reviewers have been giving it or do you really get what you pay for?
WcF2rD9.jpg

logo.png

Note: Orange 10 SLA 3D Printer provided by Longer directly.

Review by Devin and proofing by Xzi.

Introduction


The Orange 10 uses Stereolithography (SLA) technology to create objects out of resin. It does this by lowering a metal build plate into a vat of resin that has clear film on the bottom. Underneath that film is a UV LCD screen that shines a UV light pattern directly into the vat which cures the resin and attaches it to the build plate. The build plate is then moved up and another layer of resin is cured on top of the previous layer. This process is repeated until an object is created.

Specifications


N22WY7S.jpg


tests2.jpg Webp.net-resizeimage (1).jpg
  • Unit Height: 170 x 170 x 360mm
  • Print Height: 98 x 55 x 140mm
  • Print Resolution: 854 x 480
  • Light Source: UV LED 405nm
  • Display Screen: 2.8" color touch screen
  • Max Build Speed: 30 mm an hour
  • Unit Weight: 5.4kg
  • Power Consumption: 41W
  • Connections: mSD card
  • Supported Resins: Rigid, Dental, Castable, and more.
  • Price: $268.00 (Additional $20 savings with Amazon coupon.)
Unboxing and Setup


nSIJy6N.jpg


67468085_493272451500578_3598809288375533568_n.jpg 68411833_609527829574411_1001938315932336128_n.jpg 68367744_1507948489346669_1993661155230351360_n.jpg
The Orange 10 came very well packaged with three layers of styrofoam protecting the main base and acrylic sheets. There were also a ton of great extras included so that you can start printing right out of the box.

The Orange 10 SLA printer includes the following:
  • 5x Acrylic Sheets (Hood)
  • 2x Bands
  • 1x Main Base
  • 1x Build Plate
  • 1x Resin Vat
  • 1x 16GB mSD Card
  • 1x mSD Card Reader
  • 1x Power Adapter
  • 2x Resin Filter Funnels
  • 1x Pair of Latex Gloves
  • 1x Scraper
  • 1x 250mL Bottle of Brown Resin (Note: The bottle was in a vacuum sealed bag initially.)
  • 5x Playing Cards
  • 1x Release Film (Preinstalled on resin vat.)
  • 1x Wrench Kit (Containing wrenches that are 1.5, 2, 2.5, 3, and 4mm.)
Assembly:

3OvO2XA.jpg


67826682_353628145570273_4264061222439092224_n.jpg 68883590_743881616030606_2308885349297815552_n.jpg
Assembly was incredibly easy and took about 25 minutes to put everything together. I started by grabbing the acrylic sheets and elastic bands so that I could create the hood for the printer. The hood blocks outside sources of UV light that could potentially cure the resin in the vat. All I had to do was attach the acrylic sheets together in the shape of the hood and use the elastic bands to hold them in place.

yAu3Kcz.jpg


68551400_895859000772838_2601876095401721856_n.jpg 68244645_2328250524106465_4346159805769973760_n.jpg 67799024_2452016321696892_719920691578667008_n.jpg 67782898_465489860675694_4185780521436971008_n.jpg 68475249_355564435350912_43513305813221376_n.jpg

The next step was to turn on the printer so that I could raise the z axis in order to install the build plate. The printer turns on via a switch on the back of the main base and when turned on it displays file and setting options on the touch screen. Raising the z axis was as simple as clicking the settings option, clicking move and pressing the up arrow. Once the z axis was raised high enough I was able to install the build plate. A simple thumbscrew holds it in place and you'll want to tighten it down well so the plate doesn't move while printing. Once that was done I was ready to level the bed so the build plate didn't come crashing down into the vat when trying to print. To level the bed all you need to do is loosen the four screws surrounding the build plate using the included 4mm hexagon wrench. Once they're all loose to the point where the build plate wobbles freely, you're going to want to grab a sheet of A4 paper and place it on the LCD screen located on the top of the main base. After that you'll want to go back into the machine's settings and click the home button (located in Settings -> Move, middle button on the bottom row). This will bring the build plate all the way to the bottom of the z axis until it touches the A4 paper you have on the LCD screen. Once it stops moving you're going to want to press down lightly on the build plate and tighten those four screws. When all four screws are tightened you're going to want to try to move the A4 paper. If it requires some force to move the paper then it's leveled properly but if it's too easy or too tough to move the paper then you'll need to relevel. If it's too easy then apply more pressure on the build plate and if it's too tough apply less.

OUZdHHl.jpg


67800227_728665297567814_2875926980623073280_n.jpg 67626603_670269773378531_3659443042500214784_n.jpg
With the difficult part over, all that's left is to attach our vat to our printer, which is held onto the main base using two thumbscrews. Once the vat is attached put on the included gloves and start pouring some of the included brown resin in for your first print. I used a transparent resin that I purchased separately. I recommend only filling up the vat 2/3 of the way full to give enough room for the build plate to plunge into it. Otherwise you may have resin spill out of the vat and onto the main base. After your resin is poured into the vat you can put the hood on. It's time to start printing!

Usage


Software:
uh1drQ5.png


two.PNG three.PNG four.PNG four.PNG six.PNG seven.PNG
The Orange 10's 16GB mSD card has their slicer software included, along with some sample objects that you can print straightaway. A slicer is a program that you use to convert a standard model into instructions for the printer (how long each layer needs to cure, what pattern the LCD screen need to display, etc). I started off by printing a model called "Three Wise Skulls" which you can see an image of in the next section but for now I'll focus on how I printed my own objects. Once the software is launched you'll see a virtual version of your build plate which also shows the max allowable length, width and height of your printed object. Along with the virtual build plate there's a + button that allows you to import your model. I typically get my models from a website called Thingiverse which has hundreds of thousands of users creating awesome models that are free to download. I was interested in 3D printing a figurine of Mei and luckily I found a model made by a user called Round.

When you first import a model you may get an error starting that the model is too large like the Mei model did. You can use the scale tool in the slicer software in order to rescale it to fit on the virtual build plate. Once the model fits on the virtual build plate, the model will be blue instead of red, and you can move onto the next step in the slicer which is the auto fix. If your model has any weird issues like holes the fix step smooths them out for you. After your model is fixed (assuming any fix is necessary), we'll move onto the supports step. While the printer is excellent at curing layers of resin, if there isn't anything for that layer of cured resin to attach to it'll just float freely in your vat. Supports give models something to attach it to the build plate so that doesn't happen. I've personally found that the default density is a bit much for most of the models I've printed and usually lower it down to .45. Once you've selected your support density click the generate button to have the slicer software automatically create supports at where it thinks the model will need them. Once you've generated your supports the next step is to select the "layer thickness" for your object. If you'd like your object to be super smooth then choose a lower thickness, though this will require more layers and therefore a longer print time. If you don't mind seeing the layer lines, choose thicker layers. The final step is to save the project and copy it over to the mSD card. The Orange 10's slicer software creates a folder in the same directory as the model you imported that contains the project. You'll need to drag and drop the preview and .lgs file into the root of the mSD.


Hardware:

dqZDZRF.jpg


68401425_393175467987719_3401466214118064128_n.jpg 67691219_770443730038029_4478914831117713408_n.jpg
You've assembled the printer, made your project using the Orange 10's slicer program and are wondering what incredibly difficult step you have left before you can just make that awesome figurine of your anime waifu. I'm happy to say that the next step is actually starting the print. Insert the mSD card with your project into the mSD slot on the right side of the main base and turn on your printer. Now you'll want to select the file option and select your project from the list. Press the play button and then press the checkmark button. Congrats! You'll just started your first 3D print and in a few hours you'll have your object. When you're done admiring your object there are a few more steps that you'll need to complete in order to make it so your object is stronger and doesn't smell like resin.

Processing:

1nnvj3A.jpg


(Pretend that this is my Mei figure. Forgot to take a picture of it in the bag.)
When your object is done the build plate will move up until it's out of the resin. While wearing gloves take off the hood and unscrew the thumbscrew holding the build plate in place. There is definitely going to be some residual resin on top of the build plate that you can scrape off using the cards included in the kit. Corrects to, "Once you've gotten as much of the liquid resin off of the top of the build plate as possible (which you'll definitely want to do, resin is expensive) you can carefully remove the print using the included scraper. Put the object into a bag of isopropyl alcohol and swish it around for a good minute or two. We want to wash away as much residual resin that didn't cure so your print won't be so sticky and have a strong resin smell. Once you've thoroughly washed your object take it out of the bag and set it down on a piece of cloth or disposable plate. You'll either want to dry it with compressed air or pat it down with one of the included microfiber cloths. Once it's dry you'll want to either put it under a UV lamp or put it out in the sunlight for 30 minutes to an hour depending on how large the object is.

After that your print is done!

Final Results


E5gxqsY.jpg


67769840_2356021281395257_9192171972782456832_n.jpg 68696688_2953146338089974_588740914206212096_n.jpg 68273237_494666761094768_1071777490642403328_n.jpg 68755295_1147071352161187_7842316833150468096_n.jpg 68687824_1668120729987760_1039453352024342528_n.jpg
Where To Buy


EUFaHbX.jpg

vMiNiLm.png

Verdict

What I Liked ...
  • Print Quality
  • Easy Setup
  • Price
  • Features (Overheat protection, Print Pause/Resume.)
What I Didn't Like ...
  • Loud Fan
  • Acrylic Hood (Isn't a single piece.)
8.5
out of 10

Overall

Would I recommend this printer? Absolutely. Most SLA printers start off in the $400-$500s making what this SLA printer does for $268 ($248 with Amazon discount.) a bargain. The setup was incredibly easy and didn't take hours of tinkering to get excellent results. There are only two major gripes that I have with the printer; The fan that cools the LCD screen is incredibly loud (Tempted to see if I can replace it with a quieter fan.) and that the acrylic hood isn't a single piece of acrylic. Having to tie elastic bands to hold the acrylic sheets together was different and didn't give a premium feel unlike the rest of the unit. If you're interested in trying out 3D printing and would to print small things with fine detail I would recommend this SLA printer kit to get started.
  • Like
Reactions: MicmasH_Wii and Xzi
Heh. I had missed laser curing printers dropping in price like this. If surface finishes, repeatability and details achievable are even vaguely in line with the stuff I am used to then this could make some useful things.
 
  • Like
Reactions: Devin
Review cover
Product Information:

Reviews

  1. Today for review, we’ll be taking a look at the latest gaming keyboard from Meltek, the CYBER01 magnetic switch offering!

  2. Claimed to be the world's most cost-effecient i9 Mini PC, we check out the latest from Geekom.

  3. Tough enough to navigate and conquer the rugged wilderness.

  4. The Turtles are back for their umpteenth game outing, but is this one worth it?

  5. Alone in the Dark is a Survival Horror game available for PlayStation 5, Xbox Series S/X and PC.

Site & Scene News

General chit-chat
Help Users
  • No one is chatting at the moment.
    Veho @ Veho: Spring is in the air. +1