Tutorial
Updated
How to install/run ANY Switch firmware UNOFFICIALLY (WITHOUT burning any fuses)
BOOTING SX OS 1.0 WILL BURN YOUR FUSES EVEN IF YOU HAVE AUTORCM ON, NICE JOB "TX".
SX OS 1.1 WON'T BURN BUT ALSO WON'T WORK (fuse check not bypassed), USE HEKATE STILL.
SX OS 1.2+ WILL WORK FOR 2nd BOOT AND AFTER, FIRST BOOT YOU MUST STILL FOLLOW GUIDE.
AFTER FIRST BOOT YOU CAN USE briccmiiv2 VOL+ OPTION (ONLY ONCE) TO REPAIR cust_data
(if it says UNBRICC'd send briccmiiv2 and BRICC again) if you want SX to work too, not just hekate.
(^ ignore all this red text if you are not going to use SX OS ransomware on your Switch)
What you need:
a PC running Windows capable of sending RCM payloads to your Switch
a working internet connection on that PC")
a way to send the payloads via USB-C, like TegraRcmSmash
latest release of HacDiskMount
latest release of memloader
latest release of biskeydump
latest release of ChoiDujour
get them from https://switchtools.sshnuke.net
some recent-ish version of Hekate (the ones post sleep fix should work fine)
you can get prebuilt binaries from either: https://github.com/rajkosto/hekate/releases
or CTCaer's fork here: https://github.com/CTCaer/hekate/releases
something that can write raw binary files to Physical Disks, like:
Etcher: https://etcher.io/ or
Hex Workshop: http://www.bpsoft.com/downloads/ or
dd for windows: http://www.chrysocome.net/dd
(this guide will only cover Etcher, if you know what's happening its easy to use the other two)
STEP 1: MAKE A BACKUP OF YOUR ENTIRE RAWNAND AND BOOT0/BOOT1 !!!
YOU MIGHT NOT BE ABLE TO GET YOUR SWITCH BACK INTO WORKING ORDER WITHOUT THIS!
(If you ABSOLUTELY cannot FIT 32GB onto your microSD and don't mind losing ALL your downloaded content and savegames
you can do dump eMMC SYS instead of dump RAW eMMC (this skips the large USER partition), but you still MUST do BOOT)
The easiest way of doing this is by sending Hekate as a payload with a microSD with enough space free in the switch, and going:
Tools->dump eMMC BOOT, then once that's complete pressing the power button and going
Tools->dump RAW eMMC and waiting (exFAT is faster than FAT32, also larger cluster size like 128KB for exFAT, and 32KB for FAT32 is recommended)
STEP 2: GET YOUR BIS KEYS (required for using HacDiskMount)
Do this by running biskeydump.bin payload via whatever method you like
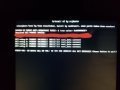
however, if using TegraRcmSmash, you can invoke the command via command prompt like this:
And all your console's keys will appear in the command prompt, so you don't have to scan the QR code
Either way, get the keys into a .txt file by copy pasting, or sending the QR code contents via email to your computer
STEP 3: DO NOT LOSE YOUR BACKUP!
Place the biskeys.txt into the same folder you have previously dumped (like BOOT0, BOOT1, RAWNAND, etc)
And then make an archive of the folder/all those files by using 7-zip or WinRAR or something. This will make it MUCH smaller
Because of that, you can place the archive in a SECURE PLACE so you DON'T LOSE IT!
STEP 4: PREPARE YOUR microSD for memloader
Place your microSD into your CARD READER on your PC and extract the CONTENTS of the sample folder of memloader zip onto the ROOT of the microSD
After this, the ROOT of the microSD should contain files like ums_boot0.ini, ums_boot1.ini, ums_sd.ini, ums_emmc.ini
SAFELY EJECT the microSD from your computer and PUT IT INTO THE SWITCH.
STEP 5: ACQUIRE THE UPDATE YOU WISH TO INSTALL
Currently supported versions are: 1.0.0, 2.0.0, 2.1.0, 2.2.0, 2.3.0, 3.0.0, 3.0.1, 3.0.2, 4.0.1, 4.1.0, 5.0.2, 5.1.0 (will support more in the future)
WARNING WARNING WARNING: Running a FIRMWARE >= 4.0.0 WITHOUT REPLACEMENT FS_XXX_nogc.kip1 ACTIVE WILL MAKE YOUR CARTRIDGE PORT UNUSABLE ON EARLIER FIRMWARES.
It can be in any form that contains firmware titles, like:
Check out https://gbatemp.net/threads/choiduj...ller-homebrew-for-the-nintendo-switch.513416/ for more info.
STEP 6: ACQUIRE A FULLY POPULATED hactool KEYS file
It will need to be able to decrypt the NCAs of the firmware version you are installing
As well as have the XCI keys if you are going to be using an cart image as the firmware source
STEP 7: GENERATE the files/images to be transferred to the console via ChoiDujour
Open a commandline to where you extracted ChoiDujour release (containing ChoiDujour.exe) and execute
If your keys.txt is not located in YOUR_HOME_FOLDER/.switch/prod.keys, you will have to use something like this instead:
Most people want the exFAT version of BCPKG2 images, if you don't, then add the --noexfat parameter to the commandline
Having trouble downloading things via https ? Add the --nossl parameter to the commandline
After the program generates the firmware files to be transferred, it will say something like:
This means it has completed successfully. Otherwise, try and diagnose the problem, you cannot continue without it.
STEP 8: TRANSFER the firmware to your Switch's eMMC:
STEP 8.1: PREPARE FOR TRANSFER
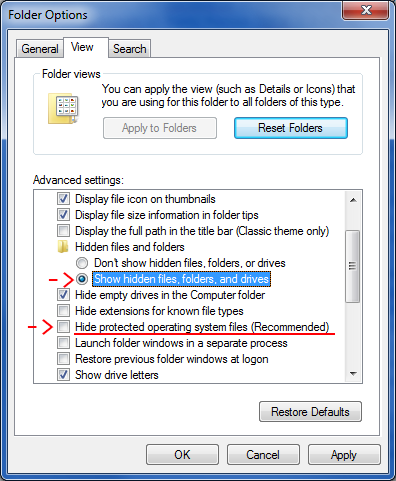
First off, you will want to set up your Windows Explorer to SHOW HIDDEN FILES and also NOT HIDE PROTECTED OPERATING SYSTEM FILES
To do this, go to "Folder Options", and set it up like so:
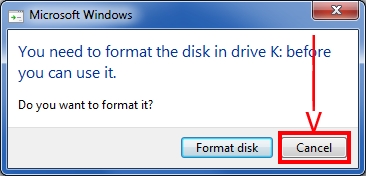
Also, EVERY time this dialog shows up, dismiss it by clicking CANCEL, NEVER FORMAT ANYTHING ON THE eMMC OR IT WILL BECOME UNREADABLE BY SWITCH.
STEP 8.2: TRANSFER BOOT0
Get your Switch into RCM mode, send the memloader.bin payload to it
On the switch's screen, navigate to ums_boot0.ini using the volume buttons, then launch it with the Power Button.
The screen should stay illuminated but black. Open your Device manager, check if you see "LINUX UMS DISK 0" under the "Disks" tree branch
If not, you should uninstall any devices that have a yellow warning icon (when uninstalling devices, make sure to check the "Delete driver software for this device" box too)
Also uninstall the device the same way if it's showing up as a "USB Download Gadget".
After device uninstallation (which you perform by right clicking in Device manager and choosing Uninstall), rescan the device manager list by clicking on the last icon in the toolbar.
The "LINUX UMS DISK 0" Disk should now be there. If it still has a yellow warning, uninstall it again, or shut down the switch (by holding the power button for 12 seconds), and try RCM->memloader again
Open Etcher. Click Select image and browse to the BOOT0.BIN inside the GENERATED NX-X.X.X folder from ChoiDujour (not your original BOOT0.bin backup you might still have somewhere)
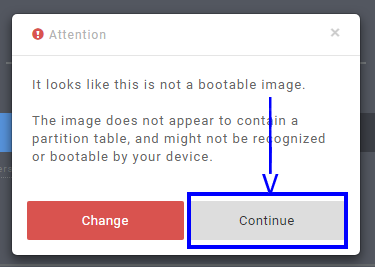
If this dialog shows up, simply click Continue (what does Etcher know, anyway?)
After the selection, Etcher should look EXACTLY like this (change the target to Linux UMS if it's not that):

If EITHER the SIZES or the NAMES of the Source and Destination are WRONG, that means you chose poorly, and clicking Flash would BREAK something
If both the NAMES and the SIZES match the above image, go ahead and click on Flash, accept the UAC prompt, and wait for it to finish, then close it.
Turn off your switch by holding the Power button for 12 seconds (confirmation will be that the screen turns off.)
STEP 8.3: TRANSFER BOOT1
Get your Switch into RCM mode, send the memloader.bin payload to it
On the switch's screen, navigate to ums_boot1.ini using the volume buttons, then launch it with the Power Button.
The screen should stay illuminated but black. You should have resolved any Device manager/driver problems in the previous step, so it will be a "LINUX UMS DISK 0"
Open Etcher. Click Select image and browse to the BOOT1.BIN inside the GENERATED NX-X.X.X folder from ChoiDujour
After the selection, Etcher should look EXACTLY like this (change the target to Linux UMS if it's not that):
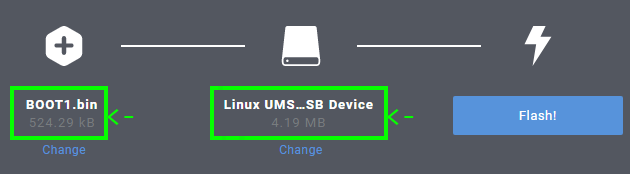
If EITHER the SIZES or the NAMES of the Source and Destination are WRONG, that means you chose poorly, and clicking Flash would BREAK something
If both the NAMES and the SIZES match the above image, go ahead and click on Flash, accept the UAC prompt, and wait for it to finish, then close it.
Turn off your switch by holding the Power button for 12 seconds (confirmation will be that the screen turns off.)
STEP 8.4: Initial eMMC SETUP in HacDiskMount
Get your Switch into RCM mode, send the memloader.bin payload to it
On the switch's screen, navigate to ums_emmc.ini using the volume buttons, then launch it with the Power Button.
The screen should stay illuminated but black. The disk should show up like in the last 2 steps.
Open HacDiskMount.exe AS ADMINISTRATOR (required to Install the driver, and to access physical disk devices on Windows 10)
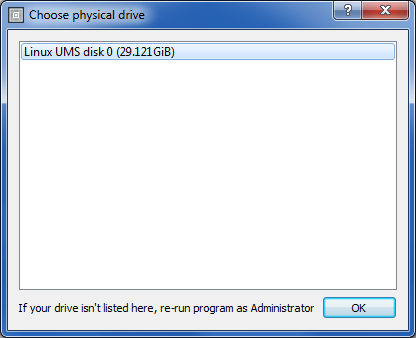
Click on the File->Open Physical drive menu item
Choose this EXACT device (name and size should match) from the list, and then click OK
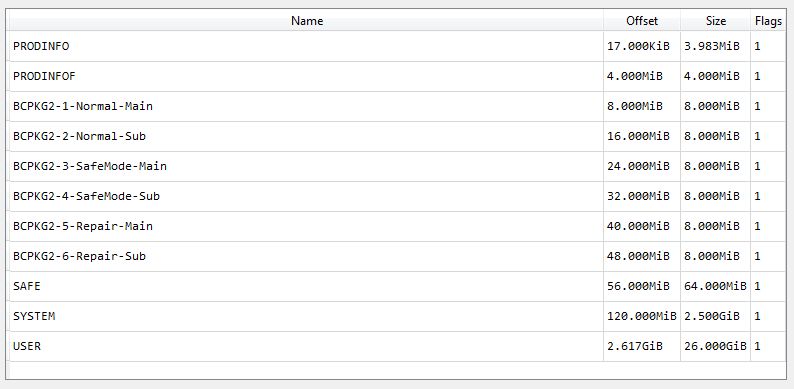
You are greeted with the partition list, we will proceed with entering and saving the BIS keys:
Double click on the PRODINFO entry. The following should show up
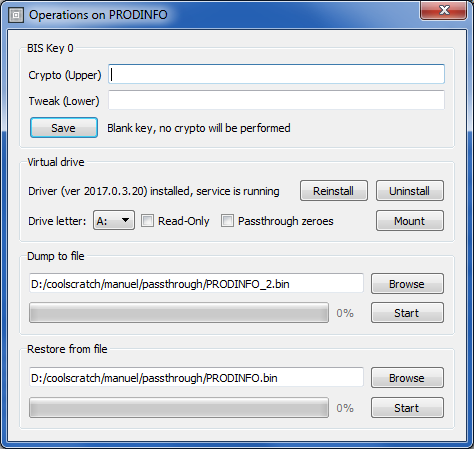
Open the biskeys.txt file in a text editor (like Notepad) and copy paste the appropriate keys into the 2 boxes
(in this case that is BIS key 0 upper and lower, you can tell which one is required above the boxes)
After entering the keys, click on the Test button right below them, the following should appear:

If the entropy text is RED, you have entered the WRONG KEY. You CANNOT CONTINUE with WRONG KEYS.
Once the entropy text is GREEN, click on Save, then close the Operations on PRODINFO dialog.
Double click on the PRODINFOF entry. The same dialog will show up, except this time the keys should be pre-filled.
Click on Test to test the key. The result should be green. There's nothing you need to do with this partition so close the dialog.
Double click on the SAFE entry. You will have to repeat the procedure you did for PRODINFO, except this time you use BIS key 1 upper/lower.
After entering the key, click on Test. The entropy text should be Green like before, click on Save and close the dialog.
Double click on the SYSTEM entry. You will have to repeat the procedure you did for SAFE, except this time you use BIS key 2 upper/lower.
After entering the key, click on Test. The entropy text should be Green like before, click on Save and close the dialog.
Double click on the USER entry. You will have to repeat the procedure you did for SYSTEM, using BIS key 3 upper/lower.
After entering the key, click on Test. The entropy text should be Green like before, click on Save and close the dialog.
STEP 8.5: Transferring the BCPKG2 images
Still in HacDiskMount, double click on the BCPKG2-1-Normal-Main entry. The following should show up.
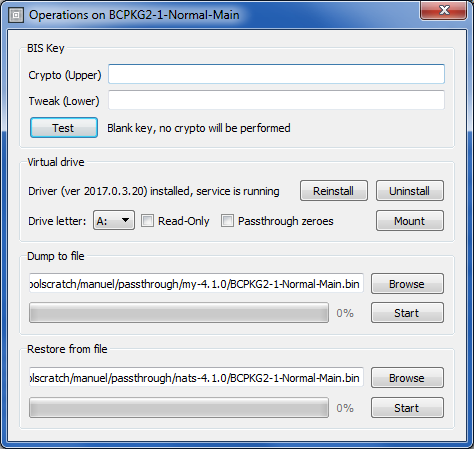
Notice that the key boxes are EMPTY ? They MUST be EMPTY for the BCPKG2* partitions. If they are not, clear them out.
In the "Restore from file" section, click on the Browse button:
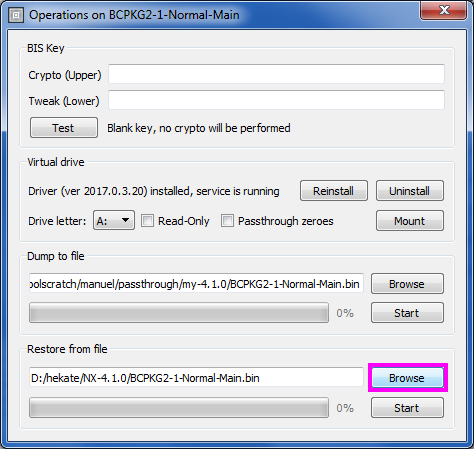
Browse to the BCPKG2-1-Normal-Main.bin file inside the GENERATED NX-X.X.X folder from ChoiDujour
Then click on Start:
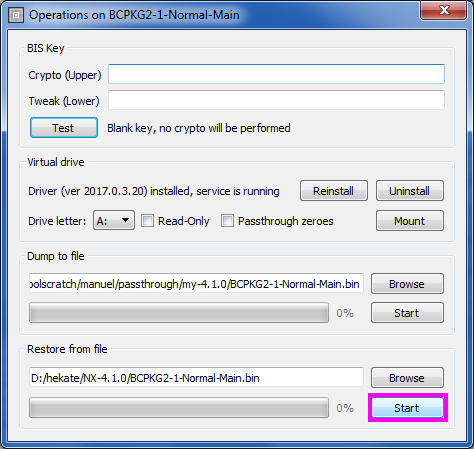
The progress bar should fill up rather quickly. After it has completed, close the Operations on BCPKG2-1-Normal-Main dialog.
You will have to repeat the procedure you just did (double clicking on the entry, browsing to the appropriately named bin file, and Starting restore)
for the rest of the BCPKG2 images: BCPKG2-2-Normal-Sub, BCPKG2-3-SafeMode-Main, and BCPKG2-4-SafeMode-Sub.bin.
Make sure to select the bin file named the same as the Partition entry when browsing to restore ! From the GENERATED NX-X.X.X folder by ChoiDujour
Close the Operations on BCPKG2-* dialogs when they are done.
STEP 8.6: Transferring the FILES for SAFE
Still in HacDiskMount, double click on the SAFE entry. This dialog will show up:
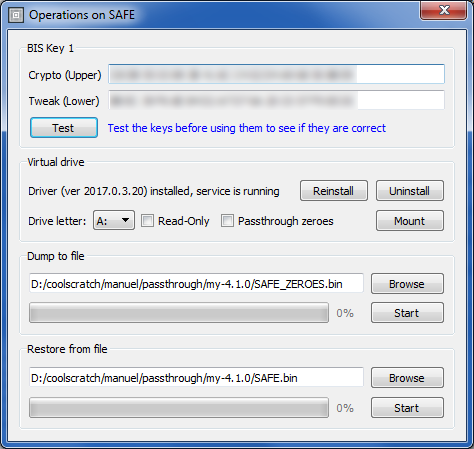
The keys should already be pre-filled (since you've set them up in Step 8.4). Click on Test, the result should be Green
(YOU CANNOT CONTINUE IF THE KEY TEST IS NOT GREEN)
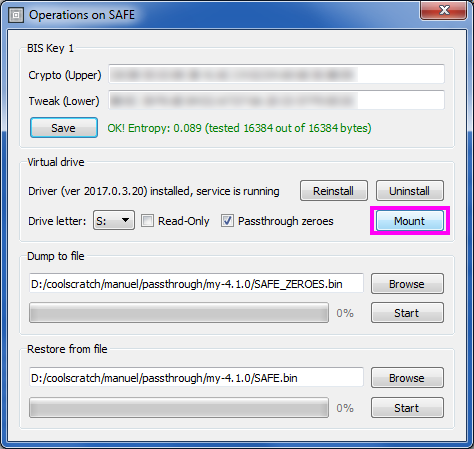
In the "Virtual drive" section, if the driver status shows up as "Driver not installed", click on the Install button right next to it.
Accept any driver publisher installation warnings that show up.
After the install is complete (application will be unresponsive for a few seconds), that section should say
Once the driver is installed, choose a drive letter (i use S: usually), check the "Passthrough zeroes" option, and click Mount:
The drive letter you have chosen should now be accessible via Windows Explorer, go to it:
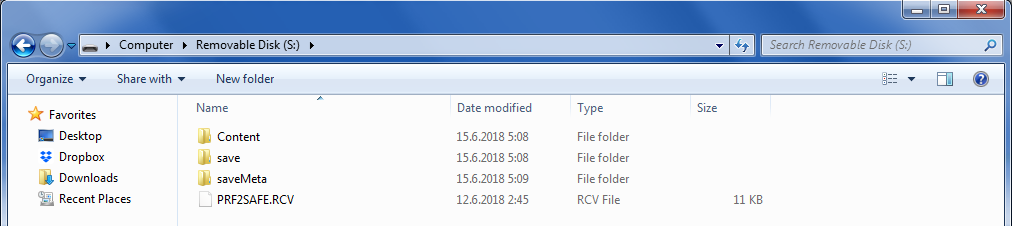
For SAFE, you want to DELETE all the existing files and folders before transferring the new ones:
Select ALL (keyboard shortcut CTRL+A), and then press SHIFT+Delete for permanent deletion:
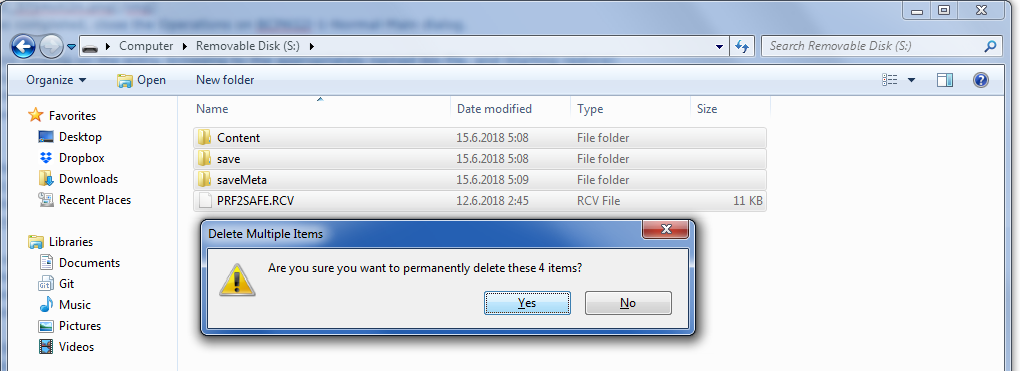
Confirm the deletion with Yes, and the partition should now be clear.
Next, go to the SAFE folder inside the GENERATED NX-X.X.X location in Windows Explorer
Select all the files/folders with CTRL+A (if there are any, otherwise skip the copy step) and then press CTRL+C (for copy)
Go back onto the mounted drive letter ( in my case S: ) in Windows Explorer, and press CTRL+V for paste
The files from the GENERATED NX-X.X.X SAFE folder should now be transferred to the mounted partition.
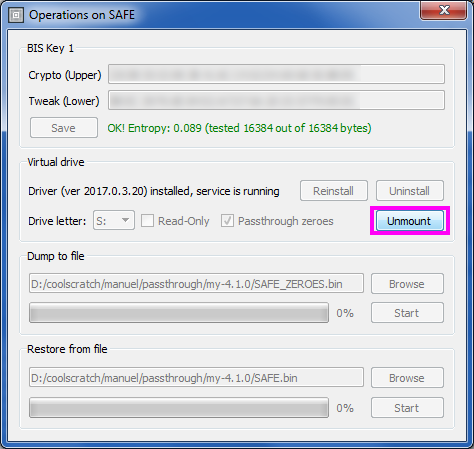
After it's done, Unmount the partition from inside the "Operations on SAFE" dialog, wait for that to complete, then close the dialog.
STEP 8.7: Transferring the FILES for SYSTEM
Still in HacDiskMount, double click on SYSTEM, Test the key, if its green, continue
Mount the partition the same way you did before, by choosing a drive letter, checking "Passthrough zeroes", and clicking on Mount
However, transferring files to SYSTEM will be a little different, you have TWO options:
1. DO A SYSTEM INITIALIZE (Will delete all your settings, installed content, accounts, savedata, etc, etc):
SELECT ALL FILES AND FOLDERS INSIDE THE MOUNTED SYSTEM PARTITION AND PERMANENTLY DELETE THEM.
2. TRY TO KEEP YOUR SETTINGS (Experimental, might NOT result in a properly working firmware when downgrading):
SELECT ONLY THE "Contents" folder and PERMANENTLY DELETE IT (maybe PRF2SAFE.RCV too, if you see it, also if you are going to use a NON-exFAT firmware version (using --noexfat option) you should make sure to delete save/8000000000000047).
After the previous SYSTEM install has been cleaned out in the way of your choosing, go to the SYSTEM folder inside the GENERATED NX-X.X.X location in Windows Explorer
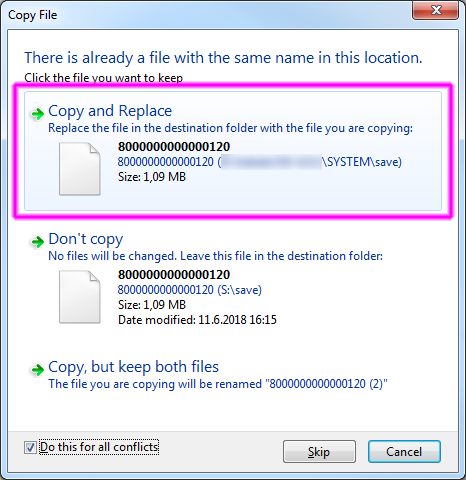
Select all the files and folders, press CTRL+C (for copy), then go back into the mounted partition drive letter, and press CTRL+V (for paste), confirming any Merge/Overwrite dialogs that show up
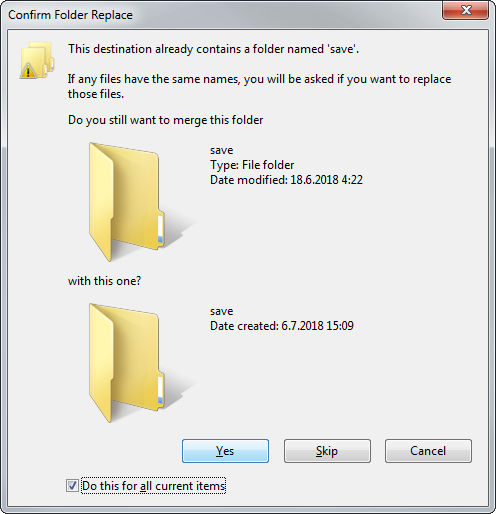
It may take a while to complete (at around 5MB/s), wait it out. After it's done, go back into the "Operations on SYSTEM" dialog in HacDiskMount, click on Unmount, then close it.
STEP 8.8: Transferring the FILES for USER
Still in HacDiskMount, double click on USER, Test the key, if its green, continue
Mount the partition the same way you did before, by choosing a drive letter, checking "Passthrough zeroes", and clicking on Mount
What you do here depends on if you chose to SYSTEM INITIALIZE for SYSTEM or NOT.
If you did SYSTEM INITIALIZE, you would want to DELETE ALL THE FILES AND FOLDERS on the mounted drive letter before transferring the new ones
But if you TRIED TO KEEP YOUR SETTINGS, you DO NOT DELETE ANYTHING (except maybe PRF2SAFE.RCV) on the mounted drive letter.
After that, just go to the USER folder inside the GENERATED NX-X.X.X location in Windows Explorer
Select all the files and folders, press CTRL+C (for copy), then go back into the mounted partition drive letter, and press CTRL+V (for paste)
Confirm any Merge/Overwrite dialogs that show up like you did for SYSTEM
After it's done, go back into the "Operations on USER" dialog in HacDiskMount, click on Unmount, then close it.
You are actually completely done with HacDiskMount at this point, you can close the whole program.
Since we won't be writing to eMMC anymore, you can turn off the Switch by holding the Power button for 12 seconds.
STEP 9: LAUNCHING THE FIRMWARE FOR THE FIRST TIME
The firmware must be launched via a specially configured hekate_ipl.ini (EVEN IF YOU ALREADY HAVE A hekate_ipl.ini SET UP, YOU MUST OVERWRITE IT WITH THIS ONE)
Get your Switch into RCM mode, send the memloader.bin payload to it
On the switch's screen, navigate to ums_sd.ini using the volume buttons, then launch it with the Power Button.
The screen should stay illuminated but black. The disk should show up like in the last 2 steps. Additionally it should just show up as a drive letter, just like a card reader would.
Go to the microSD folder inside the GENERATED NX-X.X.X location in Windows Explorer
Select all the files and folders, press CTRL+C (for copy), then go into the drive letter that showed up (for your microSD), and press CTRL+V (for paste)
Confirm any Merge/Overwrite dialogs that show up (YOU MUST OVERWRITE YOUR hekate_ipl.ini FOR NOW)
After it's done, right click on the drive letter in "My Computer"/"This PC" and click on Eject (to do a Safe Remove/Cache flush)
Then turn off your switch by holding the Power button for 12 seconds.
Since the microSD is now set up, the firmware can be launched via Hekate.
Send a hekate_ipl.bin payload via RCM, and on the Hekate screen on the Switch, you MUST CHOOSE Launch firmware -> FS_XXX option (XXX being a firmware version)
The switch will now boot normally, and either present you with the First time Setup screen (if you decided to do a SYSTEM INITIALIZATION), or just the normal menu.
Complete the First time Setup if you have to, then continue.
STEP 10: LAUNCHING THE FIRMWARE ANY OTHER TIME
IF YOUR CARTRIDGE SLOT WORKS ON <4.0.0 FIRMWARE AND YOU WISH TO KEEP IT THAT WAY, YOU MUST ALWAYS LOAD 4.0.0 OR HIGHER FIRMWARE USING THE [FS_XXX] OPTION WHICH USES REPLACEMENT FS_XXX_nogc.kip1 SYSMODULE VIA HEKATE ! EVEN A SINGLE BOOT WITHOUT THAT SYSMODULE REPLACEMENT USED WILL PERMANENTLY UPGRADE THE GAME CARTRIDGE CONTROLLER FIRMWARE TO THE 4.0.0 VERSION, MAKING IT UNUSABLE IN EARLIER FIRMWARES (so any "CFW" ini files you use YOU MUST ADD THE PROPER FS_XXX_nogc.kip1 LINE TO ALL ENTRIES).
You can now extract/use any hekate sdfiles zip back onto your microSD, and launch via hekate Launch firmware -> stock/CFW options like normal.
The switch will be in AutoRCM mode too, so your fuses are not at risk of being accidentally burned if it decides to power up normally.
STEP 11: ENJOY
SX OS 1.1 WON'T BURN BUT ALSO WON'T WORK (fuse check not bypassed), USE HEKATE STILL.
SX OS 1.2+ WILL WORK FOR 2nd BOOT AND AFTER, FIRST BOOT YOU MUST STILL FOLLOW GUIDE.
AFTER FIRST BOOT YOU CAN USE briccmiiv2 VOL+ OPTION (ONLY ONCE) TO REPAIR cust_data
(if it says UNBRICC'd send briccmiiv2 and BRICC again) if you want SX to work too, not just hekate.
(^ ignore all this red text if you are not going to use SX OS ransomware on your Switch)
What you need:
a PC running Windows capable of sending RCM payloads to your Switch
a working internet connection on that PC
a way to send the payloads via USB-C, like TegraRcmSmash
latest release of HacDiskMount
latest release of memloader
latest release of biskeydump
latest release of ChoiDujour
get them from https://switchtools.sshnuke.net
some recent-ish version of Hekate (the ones post sleep fix should work fine)
you can get prebuilt binaries from either: https://github.com/rajkosto/hekate/releases
or CTCaer's fork here: https://github.com/CTCaer/hekate/releases
something that can write raw binary files to Physical Disks, like:
Etcher: https://etcher.io/ or
Hex Workshop: http://www.bpsoft.com/downloads/ or
dd for windows: http://www.chrysocome.net/dd
(this guide will only cover Etcher, if you know what's happening its easy to use the other two)
STEP 1: MAKE A BACKUP OF YOUR ENTIRE RAWNAND AND BOOT0/BOOT1 !!!
YOU MIGHT NOT BE ABLE TO GET YOUR SWITCH BACK INTO WORKING ORDER WITHOUT THIS!
(If you ABSOLUTELY cannot FIT 32GB onto your microSD and don't mind losing ALL your downloaded content and savegames
you can do dump eMMC SYS instead of dump RAW eMMC (this skips the large USER partition), but you still MUST do BOOT)
The easiest way of doing this is by sending Hekate as a payload with a microSD with enough space free in the switch, and going:
Tools->dump eMMC BOOT, then once that's complete pressing the power button and going
Tools->dump RAW eMMC and waiting (exFAT is faster than FAT32, also larger cluster size like 128KB for exFAT, and 32KB for FAT32 is recommended)
STEP 2: GET YOUR BIS KEYS (required for using HacDiskMount)
Do this by running biskeydump.bin payload via whatever method you like
however, if using TegraRcmSmash, you can invoke the command via command prompt like this:
Code:
TegraRcmSmash.exe -w -r biskeydump.binEither way, get the keys into a .txt file by copy pasting, or sending the QR code contents via email to your computer
STEP 3: DO NOT LOSE YOUR BACKUP!
Place the biskeys.txt into the same folder you have previously dumped (like BOOT0, BOOT1, RAWNAND, etc)
And then make an archive of the folder/all those files by using 7-zip or WinRAR or something. This will make it MUCH smaller
Because of that, you can place the archive in a SECURE PLACE so you DON'T LOSE IT!
STEP 4: PREPARE YOUR microSD for memloader
Place your microSD into your CARD READER on your PC and extract the CONTENTS of the sample folder of memloader zip onto the ROOT of the microSD
After this, the ROOT of the microSD should contain files like ums_boot0.ini, ums_boot1.ini, ums_sd.ini, ums_emmc.ini
SAFELY EJECT the microSD from your computer and PUT IT INTO THE SWITCH.
STEP 5: ACQUIRE THE UPDATE YOU WISH TO INSTALL
Currently supported versions are: 1.0.0, 2.0.0, 2.1.0, 2.2.0, 2.3.0, 3.0.0, 3.0.1, 3.0.2, 4.0.1, 4.1.0, 5.0.2, 5.1.0 (will support more in the future)
WARNING WARNING WARNING: Running a FIRMWARE >= 4.0.0 WITHOUT REPLACEMENT FS_XXX_nogc.kip1 ACTIVE WILL MAKE YOUR CARTRIDGE PORT UNUSABLE ON EARLIER FIRMWARES.
It can be in any form that contains firmware titles, like:
- A cartridge XCI that contains the update (dumped from your switch using homebrew or pegaswitch, of course)
(If you are conserving space, JUST the UPDATE partition from a cartridge will work as well!)
These are common cartridges and firmware versions they contain:
These are common cartridges and firmware versions they contain:
Dragon Ball Xenoverse 2/ Mario plus Rabbids Kingdom Battle/Cars 3 Driven to Win (2.1.0)
Splatoon 2/ Sonic Forces (2.3.0)
Pokemon Tournament DX (3.0)
Batman The Telltale Series/ Syberia 2/ The Elder Scrolls V. Skyrim (3.0.1)
Attack on Titans 2/ Xenoblade Chronicles 2 (3.0.2)
Bayonetta 2/ Gal Gun 2 (4.0.1)
Kirby Star Allies (4.1.0)
Splatoon 2/ Sonic Forces (2.3.0)
Pokemon Tournament DX (3.0)
Batman The Telltale Series/ Syberia 2/ The Elder Scrolls V. Skyrim (3.0.1)
Attack on Titans 2/ Xenoblade Chronicles 2 (3.0.2)
Bayonetta 2/ Gal Gun 2 (4.0.1)
Kirby Star Allies (4.1.0)
- NCA/romfs/hfs0 containing all the firmware titles inside
- FOLDER containing all the firmware titles inside, which you can get in a couple of ways:
- from someone else who has the installed firmware you want by asking for their SYSTEM:/Contents/registered folder
- from your own switch if a "System update is pending" in your system settings, the whole SYSTEM:/Contents folder (with placehld and registered)
- *cough* xbins *cough*
Check out https://gbatemp.net/threads/choiduj...ller-homebrew-for-the-nintendo-switch.513416/ for more info.
STEP 6: ACQUIRE A FULLY POPULATED hactool KEYS file
It will need to be able to decrypt the NCAs of the firmware version you are installing
As well as have the XCI keys if you are going to be using an cart image as the firmware source
STEP 7: GENERATE the files/images to be transferred to the console via ChoiDujour
Open a commandline to where you extracted ChoiDujour release (containing ChoiDujour.exe) and execute
Code:
ChoiDujour.exe path/to/firmware/file/or/folder
Code:
ChoiDujour.exe --keyset=path/to/keys.txt path/to/firmware/file/or/folderHaving trouble downloading things via https ? Add the --nossl parameter to the commandline
After the program generates the firmware files to be transferred, it will say something like:
Code:
All files verified! Prepared firmware update is in folder NX-4.1.0STEP 8: TRANSFER the firmware to your Switch's eMMC:
STEP 8.1: PREPARE FOR TRANSFER
First off, you will want to set up your Windows Explorer to SHOW HIDDEN FILES and also NOT HIDE PROTECTED OPERATING SYSTEM FILES
To do this, go to "Folder Options", and set it up like so:
Also, EVERY time this dialog shows up, dismiss it by clicking CANCEL, NEVER FORMAT ANYTHING ON THE eMMC OR IT WILL BECOME UNREADABLE BY SWITCH.
STEP 8.2: TRANSFER BOOT0
Get your Switch into RCM mode, send the memloader.bin payload to it
On the switch's screen, navigate to ums_boot0.ini using the volume buttons, then launch it with the Power Button.
The screen should stay illuminated but black. Open your Device manager, check if you see "LINUX UMS DISK 0" under the "Disks" tree branch
If not, you should uninstall any devices that have a yellow warning icon (when uninstalling devices, make sure to check the "Delete driver software for this device" box too)
Also uninstall the device the same way if it's showing up as a "USB Download Gadget".
After device uninstallation (which you perform by right clicking in Device manager and choosing Uninstall), rescan the device manager list by clicking on the last icon in the toolbar.
The "LINUX UMS DISK 0" Disk should now be there. If it still has a yellow warning, uninstall it again, or shut down the switch (by holding the power button for 12 seconds), and try RCM->memloader again
Open Etcher. Click Select image and browse to the BOOT0.BIN inside the GENERATED NX-X.X.X folder from ChoiDujour (not your original BOOT0.bin backup you might still have somewhere)
If this dialog shows up, simply click Continue (what does Etcher know, anyway?)
After the selection, Etcher should look EXACTLY like this (change the target to Linux UMS if it's not that):
If EITHER the SIZES or the NAMES of the Source and Destination are WRONG, that means you chose poorly, and clicking Flash would BREAK something
If both the NAMES and the SIZES match the above image, go ahead and click on Flash, accept the UAC prompt, and wait for it to finish, then close it.
Turn off your switch by holding the Power button for 12 seconds (confirmation will be that the screen turns off.)
STEP 8.3: TRANSFER BOOT1
Get your Switch into RCM mode, send the memloader.bin payload to it
On the switch's screen, navigate to ums_boot1.ini using the volume buttons, then launch it with the Power Button.
The screen should stay illuminated but black. You should have resolved any Device manager/driver problems in the previous step, so it will be a "LINUX UMS DISK 0"
Open Etcher. Click Select image and browse to the BOOT1.BIN inside the GENERATED NX-X.X.X folder from ChoiDujour
After the selection, Etcher should look EXACTLY like this (change the target to Linux UMS if it's not that):
If EITHER the SIZES or the NAMES of the Source and Destination are WRONG, that means you chose poorly, and clicking Flash would BREAK something
If both the NAMES and the SIZES match the above image, go ahead and click on Flash, accept the UAC prompt, and wait for it to finish, then close it.
Turn off your switch by holding the Power button for 12 seconds (confirmation will be that the screen turns off.)
STEP 8.4: Initial eMMC SETUP in HacDiskMount
Get your Switch into RCM mode, send the memloader.bin payload to it
On the switch's screen, navigate to ums_emmc.ini using the volume buttons, then launch it with the Power Button.
The screen should stay illuminated but black. The disk should show up like in the last 2 steps.
Open HacDiskMount.exe AS ADMINISTRATOR (required to Install the driver, and to access physical disk devices on Windows 10)
Click on the File->Open Physical drive menu item
Choose this EXACT device (name and size should match) from the list, and then click OK
You are greeted with the partition list, we will proceed with entering and saving the BIS keys:
Double click on the PRODINFO entry. The following should show up
Open the biskeys.txt file in a text editor (like Notepad) and copy paste the appropriate keys into the 2 boxes
(in this case that is BIS key 0 upper and lower, you can tell which one is required above the boxes)
After entering the keys, click on the Test button right below them, the following should appear:
If the entropy text is RED, you have entered the WRONG KEY. You CANNOT CONTINUE with WRONG KEYS.
Once the entropy text is GREEN, click on Save, then close the Operations on PRODINFO dialog.
Double click on the PRODINFOF entry. The same dialog will show up, except this time the keys should be pre-filled.
Click on Test to test the key. The result should be green. There's nothing you need to do with this partition so close the dialog.
Double click on the SAFE entry. You will have to repeat the procedure you did for PRODINFO, except this time you use BIS key 1 upper/lower.
After entering the key, click on Test. The entropy text should be Green like before, click on Save and close the dialog.
Double click on the SYSTEM entry. You will have to repeat the procedure you did for SAFE, except this time you use BIS key 2 upper/lower.
After entering the key, click on Test. The entropy text should be Green like before, click on Save and close the dialog.
Double click on the USER entry. You will have to repeat the procedure you did for SYSTEM, using BIS key 3 upper/lower.
After entering the key, click on Test. The entropy text should be Green like before, click on Save and close the dialog.
STEP 8.5: Transferring the BCPKG2 images
Still in HacDiskMount, double click on the BCPKG2-1-Normal-Main entry. The following should show up.
Notice that the key boxes are EMPTY ? They MUST be EMPTY for the BCPKG2* partitions. If they are not, clear them out.
In the "Restore from file" section, click on the Browse button:
Browse to the BCPKG2-1-Normal-Main.bin file inside the GENERATED NX-X.X.X folder from ChoiDujour
Then click on Start:
The progress bar should fill up rather quickly. After it has completed, close the Operations on BCPKG2-1-Normal-Main dialog.
You will have to repeat the procedure you just did (double clicking on the entry, browsing to the appropriately named bin file, and Starting restore)
for the rest of the BCPKG2 images: BCPKG2-2-Normal-Sub, BCPKG2-3-SafeMode-Main, and BCPKG2-4-SafeMode-Sub.bin.
Make sure to select the bin file named the same as the Partition entry when browsing to restore ! From the GENERATED NX-X.X.X folder by ChoiDujour
Close the Operations on BCPKG2-* dialogs when they are done.
STEP 8.6: Transferring the FILES for SAFE
Still in HacDiskMount, double click on the SAFE entry. This dialog will show up:
The keys should already be pre-filled (since you've set them up in Step 8.4). Click on Test, the result should be Green
(YOU CANNOT CONTINUE IF THE KEY TEST IS NOT GREEN)
In the "Virtual drive" section, if the driver status shows up as "Driver not installed", click on the Install button right next to it.
Accept any driver publisher installation warnings that show up.
After the install is complete (application will be unresponsive for a few seconds), that section should say
Code:
Driver (ver 2017.0.3.20) installed, service is runningOnce the driver is installed, choose a drive letter (i use S: usually), check the "Passthrough zeroes" option, and click Mount:
The drive letter you have chosen should now be accessible via Windows Explorer, go to it:
For SAFE, you want to DELETE all the existing files and folders before transferring the new ones:
Select ALL (keyboard shortcut CTRL+A), and then press SHIFT+Delete for permanent deletion:
Confirm the deletion with Yes, and the partition should now be clear.
Next, go to the SAFE folder inside the GENERATED NX-X.X.X location in Windows Explorer
Select all the files/folders with CTRL+A (if there are any, otherwise skip the copy step) and then press CTRL+C (for copy)
Go back onto the mounted drive letter ( in my case S: ) in Windows Explorer, and press CTRL+V for paste
The files from the GENERATED NX-X.X.X SAFE folder should now be transferred to the mounted partition.
After it's done, Unmount the partition from inside the "Operations on SAFE" dialog, wait for that to complete, then close the dialog.
STEP 8.7: Transferring the FILES for SYSTEM
Still in HacDiskMount, double click on SYSTEM, Test the key, if its green, continue
Mount the partition the same way you did before, by choosing a drive letter, checking "Passthrough zeroes", and clicking on Mount
However, transferring files to SYSTEM will be a little different, you have TWO options:
1. DO A SYSTEM INITIALIZE (Will delete all your settings, installed content, accounts, savedata, etc, etc):
SELECT ALL FILES AND FOLDERS INSIDE THE MOUNTED SYSTEM PARTITION AND PERMANENTLY DELETE THEM.
2. TRY TO KEEP YOUR SETTINGS (Experimental, might NOT result in a properly working firmware when downgrading):
SELECT ONLY THE "Contents" folder and PERMANENTLY DELETE IT (maybe PRF2SAFE.RCV too, if you see it, also if you are going to use a NON-exFAT firmware version (using --noexfat option) you should make sure to delete save/8000000000000047).
After the previous SYSTEM install has been cleaned out in the way of your choosing, go to the SYSTEM folder inside the GENERATED NX-X.X.X location in Windows Explorer
Select all the files and folders, press CTRL+C (for copy), then go back into the mounted partition drive letter, and press CTRL+V (for paste), confirming any Merge/Overwrite dialogs that show up
It may take a while to complete (at around 5MB/s), wait it out. After it's done, go back into the "Operations on SYSTEM" dialog in HacDiskMount, click on Unmount, then close it.
STEP 8.8: Transferring the FILES for USER
Still in HacDiskMount, double click on USER, Test the key, if its green, continue
Mount the partition the same way you did before, by choosing a drive letter, checking "Passthrough zeroes", and clicking on Mount
What you do here depends on if you chose to SYSTEM INITIALIZE for SYSTEM or NOT.
If you did SYSTEM INITIALIZE, you would want to DELETE ALL THE FILES AND FOLDERS on the mounted drive letter before transferring the new ones
But if you TRIED TO KEEP YOUR SETTINGS, you DO NOT DELETE ANYTHING (except maybe PRF2SAFE.RCV) on the mounted drive letter.
After that, just go to the USER folder inside the GENERATED NX-X.X.X location in Windows Explorer
Select all the files and folders, press CTRL+C (for copy), then go back into the mounted partition drive letter, and press CTRL+V (for paste)
Confirm any Merge/Overwrite dialogs that show up like you did for SYSTEM
After it's done, go back into the "Operations on USER" dialog in HacDiskMount, click on Unmount, then close it.
You are actually completely done with HacDiskMount at this point, you can close the whole program.
Since we won't be writing to eMMC anymore, you can turn off the Switch by holding the Power button for 12 seconds.
STEP 9: LAUNCHING THE FIRMWARE FOR THE FIRST TIME
The firmware must be launched via a specially configured hekate_ipl.ini (EVEN IF YOU ALREADY HAVE A hekate_ipl.ini SET UP, YOU MUST OVERWRITE IT WITH THIS ONE)
Get your Switch into RCM mode, send the memloader.bin payload to it
On the switch's screen, navigate to ums_sd.ini using the volume buttons, then launch it with the Power Button.
The screen should stay illuminated but black. The disk should show up like in the last 2 steps. Additionally it should just show up as a drive letter, just like a card reader would.
Go to the microSD folder inside the GENERATED NX-X.X.X location in Windows Explorer
Select all the files and folders, press CTRL+C (for copy), then go into the drive letter that showed up (for your microSD), and press CTRL+V (for paste)
Confirm any Merge/Overwrite dialogs that show up (YOU MUST OVERWRITE YOUR hekate_ipl.ini FOR NOW)
After it's done, right click on the drive letter in "My Computer"/"This PC" and click on Eject (to do a Safe Remove/Cache flush)
Then turn off your switch by holding the Power button for 12 seconds.
Since the microSD is now set up, the firmware can be launched via Hekate.
Send a hekate_ipl.bin payload via RCM, and on the Hekate screen on the Switch, you MUST CHOOSE Launch firmware -> FS_XXX option (XXX being a firmware version)
The switch will now boot normally, and either present you with the First time Setup screen (if you decided to do a SYSTEM INITIALIZATION), or just the normal menu.
Complete the First time Setup if you have to, then continue.
STEP 10: LAUNCHING THE FIRMWARE ANY OTHER TIME
IF YOUR CARTRIDGE SLOT WORKS ON <4.0.0 FIRMWARE AND YOU WISH TO KEEP IT THAT WAY, YOU MUST ALWAYS LOAD 4.0.0 OR HIGHER FIRMWARE USING THE [FS_XXX] OPTION WHICH USES REPLACEMENT FS_XXX_nogc.kip1 SYSMODULE VIA HEKATE ! EVEN A SINGLE BOOT WITHOUT THAT SYSMODULE REPLACEMENT USED WILL PERMANENTLY UPGRADE THE GAME CARTRIDGE CONTROLLER FIRMWARE TO THE 4.0.0 VERSION, MAKING IT UNUSABLE IN EARLIER FIRMWARES (so any "CFW" ini files you use YOU MUST ADD THE PROPER FS_XXX_nogc.kip1 LINE TO ALL ENTRIES).
You can now extract/use any hekate sdfiles zip back onto your microSD, and launch via hekate Launch firmware -> stock/CFW options like normal.
The switch will be in AutoRCM mode too, so your fuses are not at risk of being accidentally burned if it decides to power up normally.
STEP 11: ENJOY
Last edited by rajkosto,