Gaming Tutorial Android Others
Updated
How to make Custom DIY amiibo cards for Nintendo Switch/WII U & 3DS Systems Tutorial!!!
Hi guys, Here's my Tutorial on:
"How to make Custom DIY amiibo cards for Nintendo
Switch/WII U & 3DS Systems Tutorial!!! "
By me (2DSGamerdude).
To make the Following You will need:

Required Tools:
- Any Android device with NFC reader/writer function)
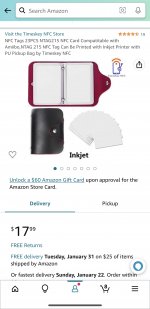
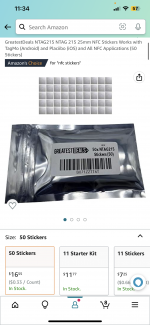
- Any Amount of blank NTAG NFC 215 cards (x 20/40/100)
from Jeff Bazos/Bezos's Amazon site:
- The collection of .bin files of the amiibos you want
to make (Find the pack via Google search {Amiibo Bins
download} (3rd link: reddit post to DL}.
- The Tagmo App: ether from Github or GooglePlay store:
https://github.com/HiddenRamblings/TagMo
or
https://play.google.com/store/apps/details?id=com.hiddenramblings.tagmo.eightbit
Optional Tools:
- The icon(s) of the amiibo your making (you can get them via the Tagmo app when it's opened & your connected via wifi)
- a printer (home/work/kiosk)
- a pair of scissors
- Any amount of TCG Slevees for Amiibo Cards (Small size, Yu-Gi-OH!! / Cardfight!! Vanguard)
- A Big enough TCG Deckbox to fit your amiibo cards


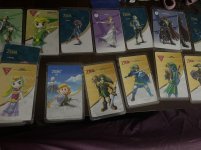
Here's a pic of Said NFC NTAG 215 cards i bought from amazon uk & my review of them (from my tutorial):

==========================================================
Meh!! Steps:
1) Step 1: On your Andriod device,
download the Tagmo App
from the Github link & install it:
https://github.com/HiddenRamblings/TagMo
or
Once Installed, launch it!!!

2) Step 2:
In the Tagmo App:
it won't look like in my picture,
so in order to get it like mine do this:
- Unzip the collection of amiibo .bin files that you
DL'd from the reddit link (can be anywhere on your
device, i.e: downloads sec for easier access)
- in tagmo: click on:
Approve the "All Files" permissions to scan device
storage and select a single root folder for access
- Allow files to load from the selected folder
(recursive)
where your amiibo .bin colletion folder is stored
(I.e: Downloads/ folder for example!)
{Downloads/Amiibo bins/folders etc}
Swipe up bar or click arrow in bottom right for folder
Display Options from 3 dot menu to toggle recursive
Once all your amiibos are loaded on tagmo,
they'll appear like in my pic (pic 3).

3) Step 3:
To Add the two .key Files (locked secret.bin & unfixed info.bin) to be found using the automated locator
Click Import both crypto keys (2) and select your file(s).
- Allow files to load from the selected folder
Once your 2 keys are loaded on tagmo,
they'll appear like in (step 3 pic).


4) Step 4:
Choose any amiibo you want & tap it to show
this menu: (Pic)
-here tap: Write,

5) Step 5:
-then if you don't have {NFC function enabled} -> tap
enable NFC.

6) Step 6:
once enabled, follow on page instructions,
take your blank NTAG 215 card & place it under your
phone (works even with cover case on!!!") ).
).
It takes a quick sec to write selected amiibo to said
tag card!!!.

7) Step 7:
once done, to check/verfiy that nfc card
contains said amiibo on it:
- tap the round scan like icon (bottom right), to tap
{Scan} amiibo card.
- Place the new made nfc card under phone
It takes a quick sec to scan & read data from selected
amiibo tag card!!!.

once done, the said amiibo (from the data which is on your recent NFC card)
should show up on your screen.
=========================================================
Optional stuff: (not required or needed unless you really want to add these to your amiibo cards ).
Once you have made your amiibo card,
but you'll want a way to know which amiibo that card has
on it, for easy acess or not to mix it up with other ones (if you have made many). An easy way is to just write on the nfc card with a Staple pen (Black) the name of the amiibo).
However, a picture of the amiibo (ether cutout or sticker)
is way better & way more prettier than a simple pen note.
=================================================================================
8) Step 8:
in tagmo, choose amiibo, (see pic)
& be connected to wifi (tap on icon, it'll open the icon full size).

9) Step 9:
once here, click on the Floppydisk save icon
to give the icon a name and save location on device).

10) Step 10:
once saved, you can find it on your phone
in .png file. copy this to a USB flash drive to open on a printer app
on pc Or print directly from your device (if able).
11) Step 11:
Print out said icon in the size of the NFC card's
Dimensions (so it'll fit), if it doesn't or goes beyond the edges of the card, cut them down to size using a pair of scissors).
12) Step 12:
take your pack of TCG style yugioh/vanguard
sleeves & put the newly made amiibo Nfc card & then the
amiibo icon cutout you just made in steps 10-11.
13) Step 13:
Done!
Enjoy your custom made Amiibo DIY NFC card
on your Nintendos's systems!!!.
Be it on Switch, Wii U or 3DS .
===============================================================
- This Tutorial is Brought to you by me, (2DSGamerdude) a fellow memeber of the esteemed video game forum
community of GBAtemp.net.
- The following tutorial can be also used for making NFC style stickers &/or Rings not just the NFC Cards stated above!!!.
- You can also use stickers on the NFC cards instead of simple A4 Paper cutouts, but you need a specific style of *sticker paper, a paper than can print theses etc.
*I didn't include this sticker method here as i couldn't find the exact sticker paper/size needed for my NFC
cards & my printer doesn't support sticker paper printing).
- This Tutorial is in no way affilated or sponsored by Nintendo, it is a fan-Made tut made from 3rd party stuff
already around the net by various people posted here on the temp for easy acess to the community here .
"How to make Custom DIY amiibo cards for Nintendo
Switch/WII U & 3DS Systems Tutorial!!! "
By me (2DSGamerdude).
To make the Following You will need:
Required Tools:
- Any Android device with NFC reader/writer function)
- Any Amount of blank NTAG NFC 215 cards (x 20/40/100)
from Jeff Bazos/Bezos's Amazon site:
- The collection of .bin files of the amiibos you want
to make (Find the pack via Google search {Amiibo Bins
download} (3rd link: reddit post to DL}.
- The Tagmo App: ether from Github or GooglePlay store:
https://github.com/HiddenRamblings/TagMo
or
https://play.google.com/store/apps/details?id=com.hiddenramblings.tagmo.eightbit
Optional Tools:
- The icon(s) of the amiibo your making (you can get them via the Tagmo app when it's opened & your connected via wifi)
- a printer (home/work/kiosk)
- a pair of scissors
- Any amount of TCG Slevees for Amiibo Cards (Small size, Yu-Gi-OH!! / Cardfight!! Vanguard)
- A Big enough TCG Deckbox to fit your amiibo cards
Here's a pic of Said NFC NTAG 215 cards i bought from amazon uk & my review of them (from my tutorial):
==========================================================
Meh!! Steps:
1) Step 1: On your Andriod device,
download the Tagmo App
from the Github link & install it:
https://github.com/HiddenRamblings/TagMo
or
Once Installed, launch it!!!
2) Step 2:
In the Tagmo App:
it won't look like in my picture,
so in order to get it like mine do this:
- Unzip the collection of amiibo .bin files that you
DL'd from the reddit link (can be anywhere on your
device, i.e: downloads sec for easier access)
- in tagmo: click on:
Approve the "All Files" permissions to scan device
storage and select a single root folder for access
- Allow files to load from the selected folder
(recursive)
where your amiibo .bin colletion folder is stored
(I.e: Downloads/ folder for example!)
{Downloads/Amiibo bins/folders etc}
Swipe up bar or click arrow in bottom right for folder
Display Options from 3 dot menu to toggle recursive
Once all your amiibos are loaded on tagmo,
they'll appear like in my pic (pic 3).
3) Step 3:
To Add the two .key Files (locked secret.bin & unfixed info.bin) to be found using the automated locator
Click Import both crypto keys (2) and select your file(s).
- Allow files to load from the selected folder
Once your 2 keys are loaded on tagmo,
they'll appear like in (step 3 pic).
4) Step 4:
Choose any amiibo you want & tap it to show
this menu: (Pic)
-here tap: Write,
5) Step 5:
-then if you don't have {NFC function enabled} -> tap
enable NFC.
6) Step 6:
once enabled, follow on page instructions,
take your blank NTAG 215 card & place it under your
phone (works even with cover case on!!!
).It takes a quick sec to write selected amiibo to said
tag card!!!.
7) Step 7:
once done, to check/verfiy that nfc card
contains said amiibo on it:
- tap the round scan like icon (bottom right), to tap
{Scan} amiibo card.
- Place the new made nfc card under phone
It takes a quick sec to scan & read data from selected
amiibo tag card!!!.
once done, the said amiibo (from the data which is on your recent NFC card)
should show up on your screen
.=========================================================
Optional stuff: (not required or needed unless you really want to add these to your amiibo cards
).Once you have made your amiibo card,
but you'll want a way to know which amiibo that card has
on it, for easy acess or not to mix it up with other ones (if you have made many). An easy way is to just write on the nfc card with a Staple pen (Black) the name of the amiibo).
However, a picture of the amiibo (ether cutout or sticker)
is way better & way more prettier than a simple pen note
.=================================================================================
8) Step 8:
in tagmo, choose amiibo, (see pic)
& be connected to wifi (tap on icon, it'll open the icon full size).
9) Step 9:
once here, click on the Floppydisk save icon
to give the icon a name and save location on device).
10) Step 10:
once saved, you can find it on your phone
in .png file. copy this to a USB flash drive to open on a printer app
on pc Or print directly from your device (if able).
11) Step 11:
Print out said icon in the size of the NFC card's
Dimensions (so it'll fit), if it doesn't or goes beyond the edges of the card, cut them down to size using a pair of scissors).
12) Step 12:
take your pack of TCG style yugioh/vanguard
sleeves & put the newly made amiibo Nfc card & then the
amiibo icon cutout you just made in steps 10-11.
13) Step 13:
Done!
Enjoy your custom made Amiibo DIY NFC card
on your Nintendos's systems!!!.
Be it on Switch, Wii U or 3DS
.===============================================================
- This Tutorial is Brought to you by me, (2DSGamerdude) a fellow memeber of the esteemed video game forum
community of GBAtemp.net.
- The following tutorial can be also used for making NFC style stickers &/or Rings not just the NFC Cards stated above!!!.
- You can also use stickers on the NFC cards instead of simple A4 Paper cutouts, but you need a specific style of *sticker paper, a paper than can print theses etc.
*I didn't include this sticker method here as i couldn't find the exact sticker paper/size needed for my NFC
cards & my printer doesn't support sticker paper printing).
- This Tutorial is in no way affilated or sponsored by Nintendo, it is a fan-Made tut made from 3rd party stuff
already around the net by various people posted here on the temp for easy acess to the community here
.
Last edited by 2DSGamerdude,


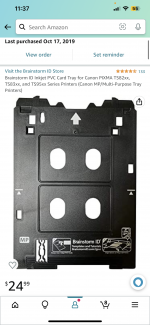
 I got my nfc cards off Amazon and I bought a id card tray for my canon printer