


Change Internal Storage from 64GB to 256GB+.
Found this across Reddit, I thought it is ok to post here as a back up and will direct the original post here.
r/Johnny Debt
Mod an OLED without cutting SoC Frame and scratching CLK (D) point? Yes and upgrade internal storage to 256GB
Have seen multiple post on OLED modchip installations but have not seen anyone use the Reball Adapter, so I decided to do this for my personal TOTK Zelda OLED edition. Oh and I also upgraded the internal storage to 256GB!
The advantages on using the Reball adapter allows us to expose eMMC CLK (D), CMD (A) and DAT0 (C) points under the eMMC, therefore does not require scratching the CLK (D) point under the SoC frame (no need to cut the SoC frame, keeping it intact), nor does it require soldering to the small resistor for the CMD (A) point and also does not rely on an DAT0 (C) adapter. Therefore, the use of the Reball Adapter provides for reliable solder connections to these points. It will never fail to glitch the Switch because of a loose / misaligned connection to DAT0 (C).
The disadvantages are that we would need to remove the eMMC to solder the Reball Adapter which is a BGA PCB. Removal of the eMMC and remounting the eMMC (to backup the Nand) requires heat and if the EMMC is destroyed or rendered non-functional in the process then it is game over since the keys to the console are on the eMMC (however an alternative method can be performed via a traditional install by scratching CLK (D) point, soldering to resistor for CMD (A) and using DAT0 adapter to get to DAT0 (C) to get a dump of the eMMC prior to installing the reball adapter). This install also requires BGA soldering and reballing skillset.
The process was as follows:
1. Removal of the original Hynix Nand
[Original NAND]

[Nand Removed Pads Cleaned]

2. Mounting the Hynix Nand onto v1 Switch eMMC module.
[Mount Original Nand on V1 Switch Nand Board]

[eMMC Reader]

3. Backing up the Hynix Nand contents in Ubuntu.
4. Reballing the Reball adapter (both sides) since the Reball adapter I received was not of high
quality (missing solder balls) and I wanted to replace the lead-free solder with leaded (lowers the
temperature required to install).
[Original Reball Adapter Bottom, lead-free solder balls]

[Original Reball Adapter Top Missing Solder Balls and lead-free solder balls]

[Reballed with leaded solder balls]

5. Installing the Reball adapter in place of original Nand
[Installed Reball Adapter]

6.Installing the upgraded 256GB Nand chip on top of the Reball adapter. 3x32awg wires fit nicely under the eMMC shield.
[Install Upgraded Nand]

[3x32 awg wires under eMMC shield]

7. Installing HWFLY using wires for CLK (D), CMD (A), DAT0 (C), 3.3v, GND and RST (B) points along with the SoC Flex. No cutting of the SoC frame required since we already have access to CLK (D) via the Reball Adapter.
[HWFLY Wires installed]

[RST \(B\) Point]

[Soc Flex and SoC Frame intact!]

[Internals]

8. Updating to HWFly modchip to use Hwfly nx firmware which allows for glitching into an empty Nand
9. Restoring the Nand backup onto the upgraded 256GB Nand.
10. Expanding the partition to Switch USER partition to 256GB in Linux and reformatting in Windows.
[System Menu, 256GB Internal Storage Upgarde]

[Homebrew]

Found this across Reddit, I thought it is ok to post here as a back up and will direct the original post here.
r/Johnny Debt
Mod an OLED without cutting SoC Frame and scratching CLK (D) point? Yes and upgrade internal storage to 256GB
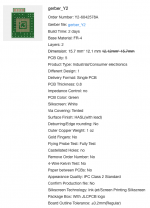
Depending on desired manufacturer and storage size, you can get them on digikey, mouser or aliexpress. You must make sure they are eMMC though as UFS won't work on the switch. There have also been 512gb eMMC chips manufactured, however they are rare.Mod an OLED without cutting SoC Frame and scratching CLK (D) point? Yes and upgrade internal storage to 256GB
Have seen multiple post on OLED modchip installations but have not seen anyone use the Reball Adapter, so I decided to do this for my personal TOTK Zelda OLED edition. Oh and I also upgraded the internal storage to 256GB!
The advantages on using the Reball adapter allows us to expose eMMC CLK (D), CMD (A) and DAT0 (C) points under the eMMC, therefore does not require scratching the CLK (D) point under the SoC frame (no need to cut the SoC frame, keeping it intact), nor does it require soldering to the small resistor for the CMD (A) point and also does not rely on an DAT0 (C) adapter. Therefore, the use of the Reball Adapter provides for reliable solder connections to these points. It will never fail to glitch the Switch because of a loose / misaligned connection to DAT0 (C).
The disadvantages are that we would need to remove the eMMC to solder the Reball Adapter which is a BGA PCB. Removal of the eMMC and remounting the eMMC (to backup the Nand) requires heat and if the EMMC is destroyed or rendered non-functional in the process then it is game over since the keys to the console are on the eMMC (however an alternative method can be performed via a traditional install by scratching CLK (D) point, soldering to resistor for CMD (A) and using DAT0 adapter to get to DAT0 (C) to get a dump of the eMMC prior to installing the reball adapter). This install also requires BGA soldering and reballing skillset.
The process was as follows:
1. Removal of the original Hynix Nand
[Original NAND]
[Nand Removed Pads Cleaned]
2. Mounting the Hynix Nand onto v1 Switch eMMC module.
[Mount Original Nand on V1 Switch Nand Board]
[eMMC Reader]
3. Backing up the Hynix Nand contents in Ubuntu.
4. Reballing the Reball adapter (both sides) since the Reball adapter I received was not of high
quality (missing solder balls) and I wanted to replace the lead-free solder with leaded (lowers the
temperature required to install).
[Original Reball Adapter Bottom, lead-free solder balls]
[Original Reball Adapter Top Missing Solder Balls and lead-free solder balls]
[Reballed with leaded solder balls]
5. Installing the Reball adapter in place of original Nand
[Installed Reball Adapter]
6.Installing the upgraded 256GB Nand chip on top of the Reball adapter. 3x32awg wires fit nicely under the eMMC shield.
[Install Upgraded Nand]
[3x32 awg wires under eMMC shield]
7. Installing HWFLY using wires for CLK (D), CMD (A), DAT0 (C), 3.3v, GND and RST (B) points along with the SoC Flex. No cutting of the SoC frame required since we already have access to CLK (D) via the Reball Adapter.
[HWFLY Wires installed]
[RST \(B\) Point]
[Soc Flex and SoC Frame intact!]
[Internals]
8. Updating to HWFly modchip to use Hwfly nx firmware which allows for glitching into an empty Nand
9. Restoring the Nand backup onto the upgraded 256GB Nand.
10. Expanding the partition to Switch USER partition to 256GB in Linux and reformatting in Windows.
[System Menu, 256GB Internal Storage Upgarde]
[Homebrew]
Last edited by 91ajames,


 Or others