Tutorial  Updated

How to flash the HWFLY Clone chips

See below for updates.

IF YOU BREAK YOUR BOOT0 PIN. DO NOT DM ME ASKING FOR HELP. THAT'S IT. YOU BREAK THAT PIN AND YOU CANT FLASH. YOUR CHIP IS STUCK WITH WHATEVER HWFLY PUT ON IT


Pre-requisites:


  • Raspberry Pi Zero W
    • You may use another flasher if you desire.
  • Pinout Diagram
  • Modchip Diagram
  • FULL_CHIP_STOCK.bin
  • Modchip Diagram, find the PA9(TX) and the PA10(RX) pins on your modchip, and do the following:
    • Connect GPIO14(TX) on your Raspberry Pi Zero W to the PA10(RX) pin on your modchip.
    • Connect GPIO15(RX) on your Raspberry Pi Zero W to the PA9(TX) pin on your modchip.

  1. Solder a wire to each of the following pinouts on the Raspberry Pi Zero W:
    • 3.3V
    • Ground
    • GPIO 14 (UART TX)
    • GPIO 15 (UART RX)
  2. Do the following to prepare the modchip:
    1. Lift pin 44 (also known as BOOT0).
    2. You will need a way to power the chip, so you need to find two 3.3v points. It can be on a MOSFET, but it will differ based on the revision of the modchip.
    3. Connect Ground on your Raspberry Pi Zero W to the Ground pin on your modchip.
    4. Check the Modchip Diagram, find the PA9(TX) and the PA10(RX) pins on your modchip, and do the following:
      • Connect GPIO14(TX) on your Raspberry Pi Zero W to the PA10(RX) pin on your modchip.
      • Connect GPIO15(RX) on your Raspberry Pi Zero W to the PA9(TX) pin on your modchip.
  3. Boot your Raspberry Pi Zero W and do the following:
    1. In the terminal, type the following command, and press enter:
      Bash:
      sudo nano /boot/config.txt
    2. Add the following line to the end of the file:
      INI:
      dtoverlay=pi3-miniuart-bt
    3. Press CTRL + X to save and exit the editor.
    4. In the terminal, type the following command, and press enter:
      Bash:
      sudo nano /boot/cmdline.txt
    5. Remove the following line from the file:
      INI:
      console=serial0,115200
    6. Press CTRL + X to save and exit the editor.
    7. Restart your Raspberry Pi with this command
      Bash:
      sudo /sbin/reboot
    8. In the terminal, type the following commands, and press enter after each command:

      Bash:
      git clone https://github.com/Pheeeeenom/stm32flash.git
      cd stm32flash
      sudo make install
  4. Now you will flash the modchip.
    Note: This will remove read protection, and the modchip will wipe itself (that is what we want).
    1. In the terminal, type the following command, and press enter:
      Bash:
      stm32flash -k /dev/serial0
    2. Now to flash Spacecraft-NX Version 0.2.0, type the following, and press enter:
      Bash:
      stm32flash -v -w ./FULL_CHIP_STOCK.bin /dev/serial0
  5. Once you're done flashing your modchip, remove the wiring from the modchip, and restore the 3.3v pin on the modchip to its original position.

Please post pictures of your work here to further the identification of the different board revisions!


UPDATE: So it seems like stitching the spacecraft bootloader and firmware together from the repo causes unstable glitching behaviors. For now, consistent glitching behavior works with this bootload/firmware combo.
This is the original file on the OLED variant chip which has 0.2.0 spacecraft. As for glitching, I'll figure it out, give me some time...unless someone else wants to hop in and reverse the differences.

For now, this at least solves the 0.1.0 HWFLY gen 3 issue. More to come.

UPDATE 2: This is only going to work on some HWFLY chips. Older ones use higher protection than the new revisions that seem to use the QFN FPGA.

UPDATE 3: This should fully work on OLED modchips with the QFN FPGA. https://github.com/Pheeeeenom/firmware
 
Last edited by Mena,

lufeig

Well-Known Member
Member
Joined
Oct 22, 2009
Messages
306
Trophies
1
Age
45
Location
São Paulo, Brazil
XP
1,057
Country
Brazil
Tried to flash. Showed on PC as COM5. Putty worked. Flashing showed !!DONE!!, but it didn't train, didn't improve glitch times, and doesn't show firmware version on NO SD screen (ie it didn't actually flash). Do I need to use the programmer method?

EDIT: alright got it to work with Mena's excellent help, here are the steps:

0. Remove SD card. Do not put in your SD card at any point during these steps. Also, if Putty ever says you've lost connection or disconnected, just reconnect.
1. Plug in to PC with battery connected and device as close to fully assembled as possible (heatsink, SD/Gamecard board, heat shield, wireless antennas, etc. all installed and screwed in)
2. Connect with Putty (for me it was COM5)
3. Press power button on console (WARNING: this will boot OFW, for those of you for some reason worrying about fuses on a permanently hacked device just don't do this)
4. Once the console is on press E, wait a second after it stops outputting things, then press P. Wait for a little bit longer. A 2nd message will show after the first few (mine said Samsung, I assume this is because I have Samsung RAM in my console, it might say Micron if yours has Micron RAM)
5. Try to flash using flash.bat (this may not work, if it doesn't, disconnect and reconnect the USB)
6. Connect with Putty again (once again may require disconnecting and reconnecting USB)
7. Press R to wipe old glitch data
8. Unplug USB and try to boot.
9. Should start training (blinking yellow light). This means success.

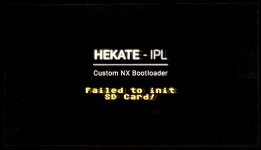
NOTE: the "NO SD" screen is now "Hekate IPL - Failed to init SD Card!", this is intended.

If it doesn't start training, power off, connect USB, connect with Putty, turn on the console (once again will boot OFW), and press T. The console will now start training. Do not unplug the USB or disconnect Putty until the light turns green.

For me this put glitch times pretty much on par in terms of boot times with my OG Core and Lite. Mad props to Mena, this is absolutely fantastic. Also included in this update:
View attachment 297633
Big thanks to Mena. If you ever talk to him, make sure to thank him for the great work he's done.

EDIT 2: this should only be necessary if you were already using the chip on the included firmware. If it hasn't been installed flashing using the regular Spacecraft-NX instructions should be fine. Try just flashing regularly first, only do this if you still get the Spacecraft-NX "NO SD" screen after doing so.
Thanks, I managed to flash it successfully only after following your detailed instructions!

But I couldn’t get the boot ofw option by pressing vol+/vol-

Am I doing something wrong here or r040 doesn’t have this feature like r022?
 

Attachments

  • BA062987-0C52-4528-8737-9419577C81A6.jpeg
    BA062987-0C52-4528-8737-9419577C81A6.jpeg
    714.2 KB · Views: 110
Last edited by lufeig,

Mena

Well-Known Member
OP
Member
Joined
Oct 5, 2020
Messages
148
Trophies
0
Age
29
XP
1,032
Country
United States
Thanks, I managed to flash it successfully only after following your detailed instructions!

But I couldn’t get the boot ofw option by pressing vol+/vol-

Am I doing something wrong here or r040 doesn’t have this feature like r022?
are you pressing both at the same time on that screen
 
  • Like
Reactions: lufeig

lufeig

Well-Known Member
Member
Joined
Oct 22, 2009
Messages
306
Trophies
1
Age
45
Location
São Paulo, Brazil
XP
1,057
Country
Brazil
are you pressing both at the same time on that screen
Ok, now I understood how it works, thank you very much!

Before I thought that by pressing vol+ and vol- on boot, even with micro SD card in, it would boot OFW.

Everything seems to be working fine!

Again, thank you very much!
 

Vladjaye

Well-Known Member
Newcomer
Joined
Jan 11, 2021
Messages
48
Trophies
0
Age
28
XP
379
Country
United States
I did try to flash the r040 over original Chinese r022. the flash.bat did show many dots, but not the DONE! message. No training, only the old NO SD screen with omega characters instead of fw version in the corner. Apparently did not go through. Flashed the r22 back for now - have the fw version shown properly again. Will wait for better option.
 

xdMatthewbx

Well-Known Member
Newcomer
Joined
Nov 9, 2017
Messages
52
Trophies
0
Age
54
XP
417
Country
Canada
I did try to flash the r040 over original Chinese r022. the flash.bat did show many dots, but not the DONE! message. No training, only the old NO SD screen with omega characters instead of fw version in the corner. Apparently did not go through. Flashed the r22 back for now - have the fw version shown properly again. Will wait for better option.
Please check instructions in this post. I had the same issue, this fixed. https://gbatemp.net/threads/tutorial-how-to-flash-the-hwfly-clone-chips.606008/page-16#post-9745944
 
  • Like
Reactions: Vladjaye

Mena

Well-Known Member
OP
Member
Joined
Oct 5, 2020
Messages
148
Trophies
0
Age
29
XP
1,032
Country
United States
Just a heads up: There was a big bug, I updated the release on github. If you downloaded it and flashed it prior to this post, you probably have some shitty boot times 30s. This will fix it.
 

Vladjaye

Well-Known Member
Newcomer
Joined
Jan 11, 2021
Messages
48
Trophies
0
Age
28
XP
379
Country
United States
Just a heads up: There was a big bug, I updated the release on github. If you downloaded it and flashed it prior to this post, you probably have some shitty boot times 30s. This will fix it.
Would I need to follow the same instructions as these from the previous page? Use Putty? Or it should be flashable now?
 

xdMatthewbx

Well-Known Member
Newcomer
Joined
Nov 9, 2017
Messages
52
Trophies
0
Age
54
XP
417
Country
Canada
Would I need to follow the same instructions as these from the previous page? Use Putty? Or it should be flashable now?
That fix was for training time. The instructions I list are for getting around an issue the original firmware creates. Until there is a specific fix for that problem, the steps I listed will be necessary.
 

lufeig

Well-Known Member
Member
Joined
Oct 22, 2009
Messages
306
Trophies
1
Age
45
Location
São Paulo, Brazil
XP
1,057
Country
Brazil
Just a heads up: There was a big bug, I updated the release on github. If you downloaded it and flashed it prior to this post, you probably have some shitty boot times 30s. This will fix it.
flash.bat on latest release in faulty.

use flash.bat from a previous release, or edit it with a text editor and replace FirmwareUpdate.bin with FirmwareUpdater.exe, save and close.

profit!

updated mine with revised r040, working perfectly fine so far!
 

LUCKASS

Well-Known Member
Member
Joined
Apr 17, 2017
Messages
102
Trophies
0
Age
26
XP
941
Country
France
Hey! Today a reputable local modding console shop told me that they have SX original chip in stock and they can install it in my OLED with a new Firmware. He told me the SX chip are using better component compared to the HWFLY clones. What is your opinion on this?
Should I get the HWFLY or better go with the SX chip?

Here's what he told me when asked if he could install a HWFly on my oled :

"[...] I would not use QSB Data since it's worth sh*t [...]. I only use original SX reflashed."
 
Last edited by LUCKASS,

fragged

Well-Known Member
Member
Joined
Jun 19, 2018
Messages
229
Trophies
0
Age
39
XP
1,259
Country
United States
Hey! Today a reputable local modding console shop told me that they have SX original chip in stock and they can install it in my OLED with a new Firmware. He told me the SX chip are using better component compared to the HWFLY clones. What is your opinion on this?
Should I get the HWFLY or better go with the SX chip?

Here's what he told me when asked if he could install a HWFly on my oled :

"[...] I would not use QSB Data since it's worth sh*t [...]. I only use original SX reflashed."
That guy does not have real SX modchips, unless he can show you the box, and connect to it over USB Serial in Putty to show you this screen I call bullshit.
First picture is a stock SX Lite with the original V1.0 firmware, second picture is what is shown when you press V in Putty when connected to the chip & it's updated with SpaceCraft-NX v0.2.0.
 

Attachments

  • Discord_btHAm0jqIu.png
    Discord_btHAm0jqIu.png
    40.5 KB · Views: 93
  • Discord_90I08nXCwT.png
    Discord_90I08nXCwT.png
    83.1 KB · Views: 86

Dean_

Well-Known Member
Member
Joined
Sep 11, 2014
Messages
684
Trophies
0
XP
712
Country
I have OLED-specific modchip with broken USB connection. I am considering flashing the @Mena 's 0.40 firmware.
I tried flashing using internal sdloader updater (firmware.bin+ .force_update method), and using ST-Link v2.
But both method gave me NO SD screen and broken version number at the right lower corner of the screen.
Resetting by shorting out 2 pads of the left side of the USB port in the modchip didn't help.
I couldn't reset emmc payload using putty, so I even tried flashing clean BOOT0 in hekate which was made with EmmcHaccGen.
With clean BOOT0 with 0.40 firmware, glitch was failing with infinitely blinking yellow light.
I gave up, and I went back to chinese r0.22, working.

Maybe implementing payload writing in the reset function will help this kind of problem I guess..?

EDIT : I got some help from someone and it's working flawlessly. Thank you for the great firmware.
 
Last edited by Dean_,
  • Like
Reactions: doom95

FR0ZN

Well-Known Member
Member
Joined
Nov 2, 2013
Messages
1,393
Trophies
1
Age
37
XP
3,913
Country
United States
Just a heads up: There was a big bug, I updated the release on github. If you downloaded it and flashed it prior to this post, you probably have some shitty boot times 30s. This will fix it.
So r040 got a silent update?
If I download it now and flash it I'm good?
 

LUCKASS

Well-Known Member
Member
Joined
Apr 17, 2017
Messages
102
Trophies
0
Age
26
XP
941
Country
France
That guy does not have real SX modchips, unless he can show you the box, and connect to it over USB Serial in Putty to show you this screen I call bullshit.
First picture is a stock SX Lite with the original V1.0 firmware, second picture is what is shown when you press V in Putty when connected to the chip & it's updated with SpaceCraft-NX v0.2.0.
I'll ask him. But I know this shop for years and he is a very reputable person in my country.
I also found someone in my town that can install the 'good' hwfly chip for oled for 70€.
 

lufeig

Well-Known Member
Member
Joined
Oct 22, 2009
Messages
306
Trophies
1
Age
45
Location
São Paulo, Brazil
XP
1,057
Country
Brazil
I have OLED-specific modchip with broken USB connection. I am considering flashing the @Mena 's 0.40 firmware.
I tried flashing using internal sdloader updater (firmware.bin+ .force_update method), and using ST-Link v2.
But both method gave me NO SD screen and broken version number at the right lower corner of the screen.
Resetting by shorting out 2 pads of the left side of the USB port in the modchip didn't help.
I couldn't reset emmc payload using putty, so I even tried flashing clean BOOT0 in hekate which was made with EmmcHaccGen.
With clean BOOT0 with 0.40 firmware, glitch was failing with infinitely blinking yellow light.
I gave up, and I went back to chinese r0.22, working.

Maybe implementing payload writing in the reset function will help this kind of problem I guess..?

EDIT : I got some help from someone and it's working flawlessly. Thank you for the great firmware.
On page 16 there’s a post with step by step instructions to flash r040
 

Site & Scene News

Popular threads in this forum

General chit-chat
Help Users
    K3Nv2 @ K3Nv2: You allrriiiight?