


First you'll need to know whether or not your 3ds is capable of running custom firmware, we will call this CFW from now on
Step 1
figure out what hardware you have, old or new 3ds, this is pretty easy; if you have an old 3ds your game card slot will be in the back and if you have a new 3ds it will be in the front, old 3ds will be referred to as o3ds and new 3ds will be n3ds from this point forward
NOTE: if you have a 2ds then you'll need to follow the o3ds version of the guide
Step 2
next you'll need to know what system version you're on. To find the system version you're on simply open the
settings app
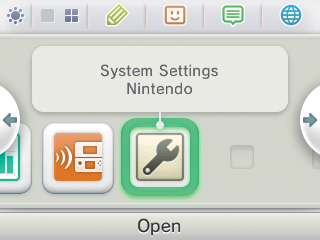
on the top screen in the bottom right hand corner you'll see a number with your system version.
if you're on a system version 9.2.0-20 or below then you're all set for this guide and if you're on anything above then this guide will not work for you unfortunately
Step 1
figure out what hardware you have, old or new 3ds, this is pretty easy; if you have an old 3ds your game card slot will be in the back and if you have a new 3ds it will be in the front, old 3ds will be referred to as o3ds and new 3ds will be n3ds from this point forward
NOTE: if you have a 2ds then you'll need to follow the o3ds version of the guide
Step 2
next you'll need to know what system version you're on. To find the system version you're on simply open the
settings app
on the top screen in the bottom right hand corner you'll see a number with your system version.
if you're on a system version 9.2.0-20 or below then you're all set for this guide and if you're on anything above then this guide will not work for you unfortunately
Step 2a
If you're on a firmware below 4.0 then you'll need to upgrade to 4.x or 6.x using a game, you'll then have to follow the without browser section, updating with a game to 5.x, 7.x, 8.x or 9.x WILL NOT WORK
If you're on a firmware below 4.0 then you'll need to upgrade to 4.x or 6.x using a game, you'll then have to follow the without browser section, updating with a game to 5.x, 7.x, 8.x or 9.x WILL NOT WORK
with browser
Step 3
Choose your custom firmware
There are several you have a choice between
personally I recommend Cakes
Step 4
Prepare your SD card
you'll need a few files
Step 5
Boot your firmware!
Once you've got everything the way you want it, we'll start with booting from the browser
NOTE: you may need to clear the browser data; Browser > settings > scroll down > initialize save data
injecting FBI into health and safety
NOTE: when using Cakes you'll need to make sure Disable Signature Checks is selected in the patches menu
NOTE: you may need to clear the browser data; Browser > settings > scroll down > initialize save data
Install emuNAND
If you want to keep your 3ds updated but don't want to lose the ability to run CFW you can run emuNAND, which is an emulated NAND on your SD card.
NOTE: When using Cakes you'll need to select the emuNAND patch in that patches menu
Use sysupdater to update sysNAND
NOTE: this step will cover using rxTools Devmode, it is also possible with Pasta, this may work on Cakes but try it a your own risk
NOTE: you do not need to perform this step if your console's sysNAND is on 9.0-9.2
Installing CIAhax
NOTE: CIAhax is not an official name, just what I'm choosing to call it for this guide
Step 10
Install Themehax on sysNAND
Install autoboot CFW
unlink your emuNAND and sysNAND
This step is optional, but recommended
NOTE: If you want to play GBA games follow the guide in the spoiler below about patching GBA firmware before performing this step
Choose your custom firmware
There are several you have a choice between
personally I recommend Cakes
Step 4
Prepare your SD card
you'll need a few files
- slot0x25keyX.bin, you can get this key from a few different places unfortunately I can't post a link here
- firmware.bin, download this and rename it to firmware.bin
- firmkey.bin this is only needed for Cakes, check the spoiler below on obtaining this
- everything goes on the root of your SD card for rxTools
- for Cakes the firmware.bin goes in the Cakes folder on your SD card
- slot0x25keyX.bin goes on the root of the SD card for both Cakes and rxTools
first get everything ready
- download this
- put the file you downloaded onto your SD card in the Cakes folder
- when you boot Cakes it'll automatically generate firmkey.bin for you
- once you have firmkey.bin you can delete the cetk file that you put in the Cakes folder
Step 5
Boot your firmware!
Once you've got everything the way you want it, we'll start with booting from the browser
NOTE: you may need to clear the browser data; Browser > settings > scroll down > initialize save data
- for Cakes open the browser and go to http://dukesrg.no-ip.org/3ds/cakes?Cakes.dat, or scan the QR code on the Cakes thread. The menu will load, congrats!
- for rxTools go to http://launch.rxtools.net it will load, congrats!
injecting FBI into health and safety
NOTE: when using Cakes you'll need to make sure Disable Signature Checks is selected in the patches menu
NOTE: you may need to clear the browser data; Browser > settings > scroll down > initialize save data
- Get the latest Decrypt9 from here
- Get the latest FBI from here
- Put Decrypt9WIP.dat on the root of your SD card
- Go to http://dukesrg.no-ip.org/3ds/cakes?Decrypt9WIP.dat in the browser
- Decrypt9 should launch
- Go into the sysNAND options and pick "Health & Safety Dump"
- follow the onscreen instructions to dump your health and safety application
- On your computer follow this to generate the needed inject files. Use FBI.cia inside the FBI.zip you downloaded earlier
- once you have done that copy the "FBI_inject_no_banner.app" or "FBI_inject_with_banner.app" to your SD card and rename it hs.app
- in Decrypt9 go back to sysNAND options and this time "Inject Health & Safety"
- if all goes well your Health & Safety app should be replaced with FBI
Install emuNAND
If you want to keep your 3ds updated but don't want to lose the ability to run CFW you can run emuNAND, which is an emulated NAND on your SD card.
NOTE: When using Cakes you'll need to select the emuNAND patch in that patches menu
- you'll need EmuNAND9Tool, you can get the latest release here
- Select the Complete emuNAND setup from the menu and follow the on screen instructions, note that you'll loose all data on your SD card
Use sysupdater to update sysNAND
NOTE: this step will cover using rxTools Devmode, it is also possible with Pasta, this may work on Cakes but try it a your own risk
NOTE: you do not need to perform this step if your console's sysNAND is on 9.0-9.2
- get the latest stable sysupdater from here
- boot into pasta or rxTools devmode
- start FBI and install the sysupdater CIA
- get a pack with all of the CIAs for 9.0, 9.1 or 9.2 and put all of the CIAs into a separate folder on the SD card (I can't post these here, sorry. They can be found on "that ISO site")
- follow the onscreen instructions to update your sysNAND
Installing CIAhax
NOTE: CIAhax is not an official name, just what I'm choosing to call it for this guide
- get the latest release here
- download the latest starter pack here
- unzip the starter pack and extract it to the root of your SD card, along with the CIA from CIAhax release
- boot your custom firmware though the browser
- start up FBI and install the CIA
- you'll need to be connected to the internet for this
- while launching the CIA hold Y, if everything goes well the homebrew launcher should load and be available offline though this CIA
Step 10
Install Themehax on sysNAND
- boot your 3ds up
- start CIAhax
- start the themehax installer, this was included with the homebrew starter kit you downloaded earlier
- follow the onscreen instructions to install themehax for your system version
Install autoboot CFW
- in the release of the CFW that you decided to use should be a .3dsx file,
- Congrats you have an autobooting CFW!
unlink your emuNAND and sysNAND
This step is optional, but recommended
NOTE: If you want to play GBA games follow the guide in the spoiler below about patching GBA firmware before performing this step
- boot your 3ds
- take you SD card out
- go into Settings -> Other Settings -> Format System Memory
Without browser 4.x-6.x
NOTE: this part of the guide assumes that you are on 4.x or 6.x or have 4.x or 6.x MSET installed
Step 3
Installing rxTools MSET exploit
What you'll need
Boot rxTools
what you'll need
Installing your first CIA
to start we're going to install a CIA manager called FBI
Installing a browser
NOTE: use step 6b if you're if you're on 4.x
Again Nintendo has made this more complicated by removing it from the CDN
you'll need
Installing the gateway MSET exploit
NOTE: only 4.x users need to follow this part, 6.x users should use step 6a above and then skip this step
you'll need
Step 7
Installing emuNAND
We'll install emuNAND in this step
Choose your custom firmware
we've been working with rxTools so far, but you have a few other choices if you'd like to try them out
Step 9
Prepare your SD card
you'll need a few files
Step 3
Installing rxTools MSET exploit
What you'll need
- a DS mode flash cart
- your flashcart's Micro SD card
- your computer
- the rxinstaller.nds in the rxTools 2.6 zip from here
- put the rxinstaller.nds on your flashcart's Micro SD card
- put the Micro SD into the flashcart and put the flashcart into your 3ds
- boot the flashcart and start rxinstaller.nds
- follow the onscreen instructions
Boot rxTools
what you'll need
- the rxTools 2.6 zip from the last step
- your 3ds
- your computer
- your 3ds's SD card
- put rxTools.dat onto your SD card
- put the SD card into the 3ds
- boot the 3ds
- Open Settings -> Other Settings -> Profile -> Nintendo DS Profile
- it'll install some data to your SD card, press A when it tells you to
- hold R while it's booting to access the menu
Installing your first CIA
to start we're going to install a CIA manager called FBI
- boot rxTools with MSET and hold R to enter the menu
- go to other options and click on the inject FBI over Health&Safety
- it will give you an error, don't worry this is normal
- in the error message it will give you a number, for example mine was v1026
- in the rxTools 2.6 zip you downloaded find the fbi_injection folder, click on your region and then click on the number that was in the error
- copy the files in the folder to your SD card
- repeat this step starting from the inject FBI over Health & Safety part
- power the 3ds off
- boot rxTools
- open the Health & Safety app, FBI should load
- download the latest FBI release from here, power the 3ds off and transfer the CIA in the FBI zip to your SD card
- put the SD back into your 3ds, boot rxTools via MSET
- open the Health & Safety app and install the latest FBI CIA
- congrats, you've installed your first CIA
Installing a browser
NOTE: use step 6b if you're if you're on 4.x
Again Nintendo has made this more complicated by removing it from the CDN
you'll need
- your computer
- your 3ds
- your 3ds's SD card
- a 6.x browser CIA for your region
- put the browser CIA onto your SD card
- boot rxTools up
- install the browser CIA with FBI, make sure the destination says "nand" on the top screen
Installing the gateway MSET exploit
NOTE: only 4.x users need to follow this part, 6.x users should use step 6a above and then skip this step
you'll need
- your DS mode flash cart
- your flashcart's Micro SD card
- your computer
- the GW_INSTALLER.nds in the gateway public beta
- put the GW_INSTALLER.nds on your flashcart's Micro SD card
- put the Micro SD into the flashcart and put the flashcart into your 3ds
- boot the flashcart and start GW_INSTALLER.nds
- follow the onscreen instructions
Step 7
Installing emuNAND
We'll install emuNAND in this step
- put the Launcher.dat from the gateway public beta onto your 3ds's SD card
- boot the 3ds
- boot rxTools
- if you're on 6.x in the browser go to http://go.gateway-3ds.com
- if you're on 4.x go to Settings -> Other Settings -> Profile -> Nintendo DS Profile
- The gateway menu should load
- go to the format emuNAND option
- note that this will erase ALL data on your SD card (except the Launcher.dat)
Choose your custom firmware
we've been working with rxTools so far, but you have a few other choices if you'd like to try them out
Step 9
Prepare your SD card
you'll need a few files
- slot0x25keyX.bin, you can get this key from a few different places unfortunately I can't post a link here
- firmware.bin, download this and rename it to firmware.bin
- firmkey.bin this is only needed for Cakes, check the spoiler below on obtaining this
- everything goes on the root of your SD card for rxTools
- for Cakes the firmware.bin goes in the Cakes folder on your SD card
- slot0x25keyX.bin goes on the root of the SD card for both Cakes and rxTools
first get everything ready
- download this
- put it onto your SD card in the Cakes folder
- when you boot Cakes it'll automatically generate firmkey.bin for you
- once you have firmkey.bin you can delete the cetk file that you put in the Cakes folder
Browserless 9.0-9.2
NOTE: this part of the guide assumes that you're on system version 9.0-9.2
Step 3
Choose your custom firmware
There are several you have a choice between
personally I recommend Cakes
Step 4
Prepare your SD card
you'll need a few files
Step 5
Installing Homebrew Launcher
Installing a Browser
Boot your firmware!
Once you've got everything the way you want it, we'll start with booting from the browser
NOTE: you may need to clear the browser data; Browser > settings > scroll down > initialize save data
injecting FBI into health and safety
NOTE: when using Cakes you'll need to make sure Disable Signature Checks is selected in the patches menu.
NOTE: you may need to clear the browser data; Browser > settings > scroll down > initialize save data
Install emuNAND
If you want to keep your 3ds updated but don't want to lose the ability to run CFW you can run emuNAND, which is an emulated NAND on your SD card.
NOTE: when using Cakes you'll need to make sure the emuNAND patch is selected in the patches menu.
Installing CIAhax
NOTE: CIAhax is not an official name, just what I'm choosing to call it for this guide
Step 11
Install Themehax on sysNAND
Install autoboot CFW
unlink your emuNAND and sysNAND
This step is optional, but recommended
NOTE: If you want to play GBA games follow the guide in the spoiler below about patching GBA firmware before performing this step
Step 3
Choose your custom firmware
There are several you have a choice between
personally I recommend Cakes
Step 4
Prepare your SD card
you'll need a few files
- slot0x25keyX.bin, you can get this key from a few different places unfortunately I can't post a link here
- firmware.bin, download this and rename it to firmware.bin
- firmkey.bin this is only needed for Cakes, check the spoiler below on obtaining this
- everything goes on the root of your SD card for rxTools
- for Cakes the firmware.bin goes in the Cakes folder on your SD card
- slot0x25keyX.bin goes on the root of the SD card for both Cakes and rxTools
first get everything ready
- download this
- put the file you downloaded onto your SD card in the Cakes folder
- when you boot Cakes it'll automatically generate firmkey.bin for you
- once you have firmkey.bin you can delete the cetk file that you put in the Cakes folder
Step 5
Installing Homebrew Launcher
- you'll need an entrypoint, like OoThax, or Ninjhax. This will not be a permanent requirement and is only needed once
- Install hax, this will not be fully covered here, check the spoiler below for more information
Installing a Browser
- You'll need the 9.2.0-20 update pack for your region, unfortunately I cannot provide it here, it can be found on "that ISO site"
- inside the update pack you'll find many CIAs, you'll need to find the browser
- for USA the browser will be 0004003000009402.cia, for JPN 0004003000008802.cia and for EUR 0004003000009D02.cia
- you'll need FBI, you can get the latest version here
- put the 3ds folder from the zip onto your SD card along with the browser CIA you got out of the update pack
- boot your 3ds up and start the Homebrew Launcher
- Start FBI, change the destination to NAND and install the browser CIA
Boot your firmware!
Once you've got everything the way you want it, we'll start with booting from the browser
NOTE: you may need to clear the browser data; Browser > settings > scroll down > initialize save data
- for Cakes open the browser and go to http://dukesrg.no-ip.org/3ds/cakes?Cakes.dat, or scan the QR code on the Cakes thread. The menu will load, congrats!
- for rxTools go to http://launch.rxtools.net it will load, congrats!
injecting FBI into health and safety
NOTE: when using Cakes you'll need to make sure Disable Signature Checks is selected in the patches menu.
NOTE: you may need to clear the browser data; Browser > settings > scroll down > initialize save data
- Get the latest Decrypt9 from here
- Get the latest FBI from here
- Put Decrypt9WIP.dat on the root of your SD card and rename it to Decrypt9.dat
- Go to http://dukesrg.no-ip.org/3ds/cakes?Decrypt9WIP.dat in the browser
- Decrypt9 should launch
- Go into the sysNAND options and pick "Health & Safety Dump"
- follow the onscreen instructions to dump your health and safety application
- On your computer follow this to generate the needed inject files. Use FBI.cia inside the FBI.zip you downloaded earlier
- once you have done that copy the "FBI_inject_no_banner.app" or "FBI_inject_with_banner.app" to your SD card and rename it hs.app
- in Decrypt9 go back to sysNAND options and this time "Inject Health & Safety"
- if all goes well your Health & Safety app should be replaced with FBI
Install emuNAND
If you want to keep your 3ds updated but don't want to lose the ability to run CFW you can run emuNAND, which is an emulated NAND on your SD card.
NOTE: when using Cakes you'll need to make sure the emuNAND patch is selected in the patches menu.
- you'll need EmuNAND9Tool, you can get the latest release here
- Select the "Complete emuNAND setup" from the menu and follow the on screen instructions, note that you'll loose all data on your SD card
Installing CIAhax
NOTE: CIAhax is not an official name, just what I'm choosing to call it for this guide
- get the latest release here
- download the latest starter pack here
- unzip the starter pack and extract it to the root of your SD card, along with the CIA from CIAhax release
- boot your custom firmware though the browser
- start up FBI and install the CIA
- you'll need to be connected to the internet for this
- while launching the CIA hold Y, if everything goes well the homebrew launcher should load and be available offline though this CIA
Step 11
Install Themehax on sysNAND
- boot your 3ds up
- start CIAhax
- start the themehax installer, this was included with the homebrew starter kit you downloaded earlier
- follow the onscreen instructions to install themehax for your system version
Install autoboot CFW
- in the release of the CFW that you decided to use should be a .3dsx file,
- Congrats you have an autobooting CFW!
unlink your emuNAND and sysNAND
This step is optional, but recommended
NOTE: If you want to play GBA games follow the guide in the spoiler below about patching GBA firmware before performing this step
- boot your 3ds
- take you SD card out
- go into Settings -> Other Settings -> Format System Memory
Downgrading to 4.2 (optional)
NOTE: I HIGHLY recommend NOT doing this process... it leaves behind a HUGE mess that could possibly impact your device later on by filling up the NAND
Gateway provided a nice way to downgrading your o3ds to 4.2, this will NOT work on a 2ds so don't try it
NOTE: There is a chance you may brick your console
you'll need:
Gateway provided a nice way to downgrading your o3ds to 4.2, this will NOT work on a 2ds so don't try it
NOTE: There is a chance you may brick your console
you'll need:
- your computer
- your 3ds's SD card with at least 1.5 GB of free space
- your 3ds
- the latest gateway beta
- gateway's downgrade file (region specific)
- put the gateway launcher.dat and the downgrade file onto your SD card
- for users with a browser go to http://go.gateway-3ds.com in your 3ds's browser
- for users without a browser you'll need to follow the above guide for installing CFW without a browser, once you get to the part where you launch the gateway menu come back here
- select the option to backup your NAND (you won't be able to downgrade if you don't)
- select the downgrade console button all the way to the right
- follow the onscreen instructions
- it will warn you to plug into power, this is HIGHLY recommended, if your 3ds dies in the process it WILL brick your console
- wait for it to downgrade
- if something happens and your 3ds bricks you'll need a NAND mod to restore the NAND backup we made earlier
NOTE: This guide assumes that you're on system versions 9.0-9.2. If you're on 8.1 (which has no browser) then you cannot perform this guide, soon there will be a way to update to 9.0-9.2 on 8.1 (as soon as the 8.1 MSET exploit is finished)
Step 3
Browserhax
NOTE: you will need an internet connection set up for this step
first we're going to install Browserhax
you'll need
Themehax
you'll need
Choose your custom firmware
Step 6
Preparing your SD card
you'll need a few files
NOTE: if you're using ReiNand you don't need these files, they are integrated into ReiNand
Step 7
Installing your first CIA
you'll need
Autoboot CFW
you'll need
Step 9 (optional)
Creating an emuNAND
NOTE: you will need an internet connection set up for this step
NOTE: you can convert a Cubic Ninja ROM into CIA with the Spoiler below on converting
you'll need
unlink emuNAND and sysNAND
This step is optional, but recommended
If you want to play GBA games follow the guide in the spoiler below before doing this step
Step 3
Browserhax
NOTE: you will need an internet connection set up for this step
first we're going to install Browserhax
you'll need
- An SD card
- A computer
- your 3ds
- on your computer go here
- download the homebrew starter kit
- unzip it onto your SD card
- put the SD card into your 3ds
- power the 3ds on
- on your computer's browser go here
- on the 3ds turn WiFi off
- press L & R this will open the camera app
- once the camera app opens tap the checkerboard icon
- scan the QR code on the computer
- once the browser loads hit home and then turn WiFi back on
- open the browser again and the homebrew launcher should load
Themehax
you'll need
- your SD card
- your 3ds
- start Browserhax
- start the Themehax installer, it should already be on your SD card from the homebrew starter kit
- follow the onscreen instructions to install Themehax
- turn the 3ds off and then hold L while booting to start the homebrew launcher
Choose your custom firmware
Step 6
Preparing your SD card
you'll need a few files
NOTE: if you're using ReiNand you don't need these files, they are integrated into ReiNand
- slot0x25keyX.bin, you can get this key from a few different places unfortunately I can't post a link here
- firmware.bin, unfortunately I can't post this one either and Nintendo took it off of the CDN, I did find it on the cakesFW thread on "that ISO site"
- firmkey.bin this is only needed for Cakes, check the spoiler below on obtaining this
- everything goes on the root of your SD card for most CFWs
- for Cakes the firmware.bin goes in the Cakes folder on your SD card
- slot0x25keyX.bin goes on the root of the SD card for most CFWs
- Put the 3ds folder from your CFW release onto the SD card
first get everything ready
- download this
- put it onto your SD card in the Cakes folder
- when you boot Cakes it'll automatically generate firmkey.bin for you
- once you have firmkey.bin you can delete the cetk file that you put in the Cakes folder
Step 7
Installing your first CIA
you'll need
- your computer
- your 3ds
- an SD card
- the latest FBI version from here
- download the dbs.zip from the attachments
- open the FBI zip
- copy the 3ds folder and the CIA to your SD card, you want to merge the folders
- insert your SD card into your 3ds and turn the power on, it'll say that it's creating management information (it may have already done this earlier), wait until it's finished, power the 3ds off and take the SD card out.
- Put the SD card into your computer, you'll notice a folder called Nintendo 3DS, inside it will be a folder with a bunch of random letters and numbers and inside that one there will be another folder with random numbers and letters, inside of it create a folder called dbs, then move the import.db and title.db files from dbs.zip into the dbs folder.
- Put the SD card back into the 3ds, power it on and go to System Settings -> Data Management -> Nintendo 3DS -> Software and wait until it's finished
- Start Themehax
- Start your CFW
- Start Browserhax
- launch FBI
- install the FBI CIA
Autoboot CFW
you'll need
- your SD card
- your CFW release
- your 3ds
- in your CFW's release zip you'll find a .3dsx file
- rename the .3dsx to boot.3dsx
- copy and replace the boot.3dsx on your SD card
Step 9 (optional)
Creating an emuNAND
NOTE: you will need an internet connection set up for this step
NOTE: you can convert a Cubic Ninja ROM into CIA with the Spoiler below on converting
you'll need
- a Cubic Ninja CIA or Cartridge
- The gateway public beta
- your 3ds
- your computer
- Backup your SD card
- copy the Cubic Ninja CIA to your SD card NOTE: Skip this step if you have a cartridge
- open the gateway public beta and copy the Launcher.dat to your SD card
- boot your CFW with Themehax
- start FBI
- Install the Cubic Ninja CIA
- Start Cubic Ninja
- open the gateway public beta
- go to Save Games for New 3DS > Cubic > Select your region > open the QR code with an image viewer
- on your 3ds go to Create > QR code > scan QR code and scan the code you opened on the computer
- the gateway menu should load
- take this opportunity to backup your NAND
- scroll over and format emuNAND
unlink emuNAND and sysNAND
This step is optional, but recommended
If you want to play GBA games follow the guide in the spoiler below before doing this step
- boot your 3ds
- take you SD card out
- go into Settings -> Other Settings -> Format System Memory
- you'll have the reinstall the MSET exploit so go back to Step 9 and follow it again
There are a few different versions of Ninjahax, we'll be covering all the versions including, otherapp which lets other games be used for the same purpose as Cubic Ninja
Versions
It's possible to install any of the above applications as CIAs and run the homebrew launcher from the installed CIA
Installation
Versions
- Ninjhax v1.x
- Ninjhax v2.x
- Ironhax
- Tubehax
- OoThax
- SmashBroshax
- Browserhax
- Themehax
- Ninjhax v1.x: This works with the game Cubic Ninja, most homebrew is compatible with this, it runs on firmware versions 4.0 to 9.2
- Ninjhax v2.x: This also works with Cubic Ninja but is compatible with 9.0 to 10.1, any homebrew that uses libkhax will not be compatible on anything above firmware 9.2 (This includes FBI, ANY CFW launcher, Decrypt9 and a few others)
- Ironhax: this works with the game Ironfall: Invasion, the same libkhax incompatibility affects this as Ninjhax v2.x NOTE: The version currently on the eShop will not work for this
- Tubehax: this works with the YouTube application, the same libkhax incompatibility affects this as Ninjhax v2.x NOTE: That this has now been patched
- OoThax: this works with the game The Legend of Zelda: Ocarina of Time, this has the same libkhax incompatibility as Ninjhax v2.x. It is also an unofficial port so there may be other issues you may encounter
- SmashBroshax: this works with Super Smash Bros. for the 3ds, the demo version works as well, this has the same libkhax incompatibility as Ninjhax v2.x, it's an unofficial port and you may encounter issues, it also requires that you compile it yourself as of this moment
- Browserhax: this works with the web browser, the same libkhax incompatibility affects this as Ninjhax v2.x, note that there are actually two different versions, one for o3ds and one for n3ds
- themehax: this works with the theme data stored on your SD card, the same libkhax incompatibility affects this as Ninjhax v2.x. Installation requires any of the 2.x based hax to install
It's possible to install any of the above applications as CIAs and run the homebrew launcher from the installed CIA
Installation
This has been made pretty easy by @Riku, so shoutouts to him.
Almost any 3DS game can be installed as a CIA
Almost any 3DS game can be installed as a CIA
- Download the Simple CIA converter here
- get your 3DS ROM that you want to convert to CIA (there won't be any info on getting this, you'll have to find it for yourself)
- open the ROM with the Simple CIA converter tool
- save the ncchinfo.bin and then copy it to your SD card, if you're converting multiple ROMs then you can select them all here as long as they all fit on your 3ds's SD card
- boot rxTools 2.6 or Decrypt9
- for rxTools hold R while it's booting, go to the decryption menu and click on generate XORpads and wait for it to finish
- for Decrypt9 boot it up either using the browser for o3ds or ninjhax for n3ds, you can get decrypt9 from here press R twice once in the menu and press A
- on the computer copy the XORpad files off of your SD card (they will have a really long name, you can't miss them)
- open the 3DS simple converter back up and open the ROM and then it's matching XORpad file (don't worry it will tell you which one you need to look for)
- copy the resulting CIA to your SD card and install it with FBI
This is a pretty simple process
NOTE: If you're using rxTools then you don't need to do this, keep in mind that if you decide to switch CFWs at any point this will be necessary to use GBA games in that new CFW (Unless that one has the on the fly GBA firm patching)
NOTE: A few games (Namely pokemon games) will either crash on boot or won't save properly, this is because their save type is not properly emulated by the GBA firm. A fix for pokemon can be found here
- Download 3DNUS from here
- If you have an o3ds in the title ID box put 0004013800000202 and in the version box type in 3665, n3ds users put 0004013820000202 in the title ID box and 4816 in the version box
- Download the patcher from here (Old3DS_AGB_FIRM_v3665_SignPatcher.rar for o3ds and New3DS_AGB_FIRM_v4816_SignPatcher.rar for n3ds)
- open the patcher and patch the cia you downloaded with 3DNUS
- Install the patched CIA with FBI on both your sysNAND and emuNAND
- Convert GBA games to CIA format with the tools here (3DS GBA Footer Generator v0.2d.rar and 3DS Simple GBA Converter v1.3.rar)
- Install CIA with FBI on sysNAND and on your emuNAND (only on sysNAND if you're just using that)
coming soon
Major overhaul started to include themehax autobooting, please note that this guide isn't finished yet, it's a WIP
Attachments
Last edited by dark_samus3,


