


I bought a second hand Nintendo Switch at a flea market. It was in bad shape. I did a complete tear down, replaced the shell, replaced most of the guts of the joy come and now it's like new.
You are using an out of date browser. It may not display this or other websites correctly.
You should upgrade or use an alternative browser.
You should upgrade or use an alternative browser.
Things you have fixed/modded recently
- Thread starter Ozito
- Start date
- Views 73,619
- Replies 624
- Likes 1

Didnt fix it myself but... my DSI
What was wrong? I have a pristine blue DSi XL that won't power on. Charge works, but not the power switch. I believe I need to replace the whole daughter board which includes the power switch and the ABXY pads.
i think it was the batteryWhat was wrong? I have a pristine blue DSi XL that won't power on. Charge works, but not the power switch. I believe I need to replace the whole daughter board which includes the power switch and the ABXY pads.

I've had this broken GBC for years and just now turned it into some sort of amplifier for my headphones to listen music.

Wasn't rocket science, just jumped wired the GBC's Audio Jack to the Volume Potentiometer LR OUT, soldered a 3.5 Male to LR IN and it works like wonders:
Now I don't have to listen my niece screaming or crying... or screaming AND crying at the same time all fucking day.

Has no sound. So probably the Capacitor is blown.
A and B won't work.
I think START is grounded. Pressing it will turn off the GBC.
A and B won't work.
I think START is grounded. Pressing it will turn off the GBC.
Wasn't rocket science, just jumped wired the GBC's Audio Jack to the Volume Potentiometer LR OUT, soldered a 3.5 Male to LR IN and it works like wonders:
Now I don't have to listen my niece screaming or crying... or screaming AND crying at the same time all fucking day.
Been fixing TVs recently. Realized after fixing my own that there are probably a lot of people selling broken tvs or tossing them out. I now have 7 working (and 2 that couldnt be saved) TVs in my house. I have a problem.
I replaced my goofy electrical tape solution with a battery holder in my Pokemon Gold cartridge recently.


Rebuilt a snapped button hinge (injury sustained when frantically whistling my pikmin so the water wraith wouldn't crush them…) using steel pins, cyanoacrylate glue and baking soda. It's not pretty, but will hopefully survive longer than the previous glue-only attempt.
CA glue cross-links with the help of water from the air (or on your skin…), but will also react with sodium hydrogencarbonate, which makes it set more quickly, forming a stronger bond and filling gaps the glue would have difficulty with alone.
I have had to file down the glue-soda composite so it doesn't press on the controller shell and make the button stick or fail to register.
Last edited by emcintosh,
LOL, I've fixed 2 in the last 2 months just by replacing the LED strips. On both LG TV's I check with an LED tester, one had 2 blown leds, the other had 3. That was enough to send the TV's into a boot loop. I got new strips from Ali express for about £8 for a full set. That'll keep them going for another 8 years or so. Next time I'm at the dump if I see a good LCD in good condition I'm going to take it home with me and then try to fix it. Just for a spare.Been fixing TVs recently. Realized after fixing my own that there are probably a lot of people selling broken tvs or tossing them out. I now have 7 working (and 2 that couldnt be saved) TVs in my house. I have a problem.
Been fixing TVs recently. Realized after fixing my own that there are probably a lot of people selling broken tvs or tossing them out. I now have 7 working (and 2 that couldnt be saved) TVs in my house. I have a problem.
Lmao well sell those TV locally, or put a TV in every room of your house lmao
 .
.Not the best photo, dark sorry. But, I just finished my FP laminated ITA rebuild of the old murky blue GBA. Nothing pretentious, no neon colors or led lights except the one it came with (power). Original buttons too. I haven't fiddled with screen calibration yet ... that was enough for one evening. But, very very nice. Screen is fantastic. (!!!) The shell, which you have to use their specific shell for the laminated screens ... it's ok, not amazing though.
A small FYI for my fellow 'temprs .. if you build one of these and want to use the original screws, be careful putting the black screw back in the battery compartment area. Apparently the original screw is slightly long for the FP shell. It made a very small dimple on the face just below the screen. Luckily I didn't punch through - would've been a $10 tragedy. I don't mind it since it's a tiny bump and centered at least. I'll know for next time.
I also did a mod-in-a-mod here. Removed the TC233A touch sensor chip off the screen adapter PCB, which completely kills the touch function. Now the OSD, FRM, and X/Y screen position controls are only by way of Sel-L-R buttons. Very nice. Info here:
https://www.reddit.com/r/Gameboy/comments/11rmms7/i_was_able_to_completely_and_permanently_remove/
Tomorrow, screen calibration with the "Aging" ROM. But, I think it's looking pretty good already.

Edit: after screen voltage pot adjustment using the "Aging" rom. Color balance and vibrance improved. Pure eye candy.
Another dark photo ... I think my phone is compensating for the screen brightness. I just wanted to show the screen off anyway, so fine.

A small FYI for my fellow 'temprs .. if you build one of these and want to use the original screws, be careful putting the black screw back in the battery compartment area. Apparently the original screw is slightly long for the FP shell. It made a very small dimple on the face just below the screen. Luckily I didn't punch through - would've been a $10 tragedy. I don't mind it since it's a tiny bump and centered at least. I'll know for next time.
I also did a mod-in-a-mod here. Removed the TC233A touch sensor chip off the screen adapter PCB, which completely kills the touch function. Now the OSD, FRM, and X/Y screen position controls are only by way of Sel-L-R buttons. Very nice. Info here:
https://www.reddit.com/r/Gameboy/comments/11rmms7/i_was_able_to_completely_and_permanently_remove/
Tomorrow, screen calibration with the "Aging" ROM. But, I think it's looking pretty good already.
Edit: after screen voltage pot adjustment using the "Aging" rom. Color balance and vibrance improved. Pure eye candy.
Another dark photo ... I think my phone is compensating for the screen brightness. I just wanted to show the screen off anyway, so fine.
Last edited by Hanafuda,
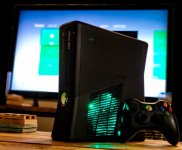
All I gotta say is... L-E-D's my guy
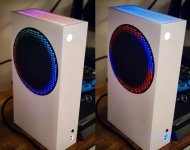
Picked up an open box of Xtreme Rate RGB mod for Series S, and went thrifting for fairy lights for the 360 S consoles. All happy customers... though my guy with the GoW Slim wasn't happy when I told him he needs a matching controller... but lemme tell you about fairy lights, it's like Popeye's... it's the shiznit!
Picked up an open box of Xtreme Rate RGB mod for Series S, and went thrifting for fairy lights for the 360 S consoles. All happy customers... though my guy with the GoW Slim wasn't happy when I told him he needs a matching controller... but lemme tell you about fairy lights, it's like Popeye's... it's the shiznit!
Attachments
Beautiful! Yeah I found my ITA screen didn't need any adjusting when I went to calibrate it. Idk if that was because it was taken from a DSi rather than supplied separately, or if they often don't need it.Not the best photo, dark sorry. But, I just finished my FP laminated ITA rebuild of the old murky blue GBA. Nothing pretentious, no neon colors or led lights except the one it came with (power). Original buttons too. I haven't fiddled with screen calibration yet ... that was enough for one evening. But, very very nice. Screen is fantastic. (!!!) The shell, which you have to use their specific shell for the laminated screens ... it's ok, not amazing though.
A small FYI for my fellow 'temprs .. if you build one of these and want to use the original screws, be careful putting the black screw back in the battery compartment area. Apparently the original screw is slightly long for the FP shell. It made a very small dimple on the face just below the screen. Luckily I didn't punch through - would've been a $10 tragedy. I don't mind it since it's a tiny bump and centered at least. I'll know for next time.
I also did a mod-in-a-mod here. Removed the TC233A touch sensor chip off the screen adapter PCB, which completely kills the touch function. Now the OSD, FRM, and X/Y screen position controls are only by way of Sel-L-R buttons. Very nice. Info here:
https://www.reddit.com/r/Gameboy/comments/11rmms7/i_was_able_to_completely_and_permanently_remove/
Tomorrow, screen calibration with the "Aging" ROM. But, I think it's looking pretty good already.
View attachment 408971
And yeah, similar to the touchscreen thing, the older cable adapter for my ITA screen (before they started offering the laminated ones) came with a little touch panel that sat inside the top edge of the case, as an optional adjustment method if you didn't solder the button controls. Unfortunately it kept activating randomly, and I had the button controls hooked up already, so I just physically cut off the little flap of flat cable that had the sensor on. Gotta mod that mod!
Why didn't you change those tiny leds on the 4 ring power button to match the color of the inside leds?All I gotta say is... L-E-D's my guy
Picked up an open box of Xtreme Rate RGB mod for Series S, and went thrifting for fairy lights for the 360 S consoles. All happy customers... though my guy with the GoW Slim wasn't happy when I told him he needs a matching controller... but lemme tell you about fairy lights, it's like Popeye's... it's the shiznit!
JK. Looks nice!I see green and green, haha. I guess customer wanted a matching mismatch set?Why didn't you change those tiny leds on the 4 ring power button to match the color of the inside leds?
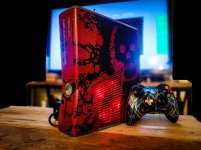
Now if you could incorperate a fog machine in there also, disco party.
I did ask if they wanted me to add the fog machine, but my absurd asking price didn't justify the means, haha.
EDT: Was trying to Xibit his slim with, pimp my box.
EDT: Was trying to Xibit his slim with, pimp my box.
Last edited by HawaiianInTown,
Beautiful! Yeah I found my ITA screen didn't need any adjusting when I went to calibrate it. Idk if that was because it was taken from a DSi rather than supplied separately, or if they often don't need it.
And yeah, similar to the touchscreen thing, the older cable adapter for my ITA screen (before they started offering the laminated ones) came with a little touch panel that sat inside the top edge of the case, as an optional adjustment method if you didn't solder the button controls. Unfortunately it kept activating randomly, and I had the button controls hooked up already, so I just physically cut off the little flap of flat cable that had the sensor on. Gotta mod that mod!
The touch control thing hasn't changed, it's still the flap that folds in under the top edge of the shell. But I've read people have had problems with "ghost" activations of the OSD turning on even after that flap is cut off. Removing the touch sensor chip off the screen adapter PCB negates the issue absolutely, and without affecting the SEL-L-R button method of control.
I'm really, really loving my "new" GBA. Also bought an Everdrive GBA mini cart, so the EZ4 is now on Gameboy Player duty. And that's my Christmas. Maybe get a bottle of Scotch too.
My wife and daughter are going to Japan for a month in June-July next year to visit family. I already told my daughter I'm giving her a mission to scrounge me up some more GBA's.

Got my cap kits for a handful of consoles today and fixed up the GB Light I recently got.

The caps are new which has reduced banding across the display, and I cleaned out the power switch and volume / contrast wheel so now the contrast slider also actually has a proper range again.
Unless I find a nice shell this is most likely how it's going to stay now.
The caps are new which has reduced banding across the display, and I cleaned out the power switch and volume / contrast wheel so now the contrast slider also actually has a proper range again.
Unless I find a nice shell this is most likely how it's going to stay now.
Similar threads
- Replies
- 17
- Views
- 2K
- Replies
- 23
- Views
- 3K
- Replies
- 18
- Views
- 1K
- Replies
- 40
- Views
- 3K
Site & Scene News
New Hot Discussed
-
-
23K views
Wii U and 3DS online services shutting down today, but Pretendo is here to save the day
Today, April 8th, 2024, at 4PM PT, marks the day in which Nintendo permanently ends support for both the 3DS and the Wii U online services, which include co-op play...by ShadowOne333 179 -
18K views
Nintendo Switch firmware update 18.0.1 has been released
A new Nintendo Switch firmware update is here. System software version 18.0.1 has been released. This update offers the typical stability features as all other... -
16K views
The first retro emulator hits Apple's App Store, but you should probably avoid it
With Apple having recently updated their guidelines for the App Store, iOS users have been left to speculate on specific wording and whether retro emulators as we... -
16K views
Delta emulator now available on the App Store for iOS
The time has finally come, and after many, many years (if not decades) of Apple users having to side load emulator apps into their iOS devices through unofficial...by ShadowOne333 96 -
15K views
MisterFPGA has been updated to include an official release for its Nintendo 64 core
The highly popular and accurate FPGA hardware, MisterFGPA, has received today a brand new update with a long-awaited feature, or rather, a new core for hardcore...by ShadowOne333 54 -
11K views
Nintendo takes down Gmod content from Steam's Workshop
Nintendo might just as well be a law firm more than a videogame company at this point in time, since they have yet again issued their now almost trademarked usual...by ShadowOne333 113 -
11K views
TheFloW releases new PPPwn kernel exploit for PS4, works on firmware 11.00
TheFlow has done it again--a new kernel exploit has been released for PlayStation 4 consoles. This latest exploit is called PPPwn, and works on PlayStation 4 systems... -
10K views
A prototype of the original "The Legend of Zelda" for NES has been found and preserved
Another video game prototype has been found and preserved, and this time, it's none other than the game that spawned an entire franchise beloved by many, the very...by ShadowOne333 31 -
9K views
Anbernic reveals specs details of pocket-sized RG28XX retro handheld
Anbernic is back with yet another retro handheld device. The upcoming RG28XX is another console sporting the quad-core H700 chip of the company's recent RG35XX 2024... -
9K views
Nintendo "Indie World" stream announced for April 17th, 2024
Nintendo has recently announced through their social media accounts that a new Indie World stream will be airing tomorrow, scheduled for April 17th, 2024 at 7 a.m. PT...by ShadowOne333 53
-
-
-
179 replies
Wii U and 3DS online services shutting down today, but Pretendo is here to save the day
Today, April 8th, 2024, at 4PM PT, marks the day in which Nintendo permanently ends support for both the 3DS and the Wii U online services, which include co-op play...by ShadowOne333 -
113 replies
Nintendo takes down Gmod content from Steam's Workshop
Nintendo might just as well be a law firm more than a videogame company at this point in time, since they have yet again issued their now almost trademarked usual...by ShadowOne333 -
97 replies
The first retro emulator hits Apple's App Store, but you should probably avoid it
With Apple having recently updated their guidelines for the App Store, iOS users have been left to speculate on specific wording and whether retro emulators as we...by Scarlet -
96 replies
Delta emulator now available on the App Store for iOS
The time has finally come, and after many, many years (if not decades) of Apple users having to side load emulator apps into their iOS devices through unofficial...by ShadowOne333 -
79 replies
Nintendo Switch firmware update 18.0.1 has been released
A new Nintendo Switch firmware update is here. System software version 18.0.1 has been released. This update offers the typical stability features as all other...by Chary -
76 replies
TheFloW releases new PPPwn kernel exploit for PS4, works on firmware 11.00
TheFlow has done it again--a new kernel exploit has been released for PlayStation 4 consoles. This latest exploit is called PPPwn, and works on PlayStation 4 systems...by Chary -
55 replies
Nintendo Switch Online adds two more Nintendo 64 titles to its classic library
Two classic titles join the Nintendo Switch Online Expansion Pack game lineup. Available starting April 24th will be the motorcycle racing game Extreme G and another...by Chary -
54 replies
MisterFPGA has been updated to include an official release for its Nintendo 64 core
The highly popular and accurate FPGA hardware, MisterFGPA, has received today a brand new update with a long-awaited feature, or rather, a new core for hardcore...by ShadowOne333 -
53 replies
Nintendo "Indie World" stream announced for April 17th, 2024
Nintendo has recently announced through their social media accounts that a new Indie World stream will be airing tomorrow, scheduled for April 17th, 2024 at 7 a.m. PT...by ShadowOne333 -
52 replies
The FCC has voted to restore net neutrality, reversing ruling from 2017
In 2017, the United States Federal Communications Commission (FCC) repealed net neutrality. At the time, it was a major controversy between internet service providers...by Chary
-
Popular threads in this forum
General chit-chat
-
 K3Nv2
Loading…
K3Nv2
Loading… -
 Psionic Roshambo
Loading…
Psionic Roshambo
Loading… -
 NinStar
Loading…
NinStar
Loading… -
G
genistopitauniverfrocrami
Loading…
-
-
-
-
@
Psionic Roshambo:
Also touch is better.... Well at least better than the launch DS, the lite one improved that a ton
-
-
@
Psionic Roshambo:
I really need to dig out my USB Wii sensor bar and experiment with Wii emulation and synching Wii remotes with BT lol
-
-
-
-
-
-
-
-
-
-
-
-
-
-
-
-
-
-
-