Tutorial  Updated

Switch Unbricking Guide - ProdInfo Fix (PikaFix)

This is an advanced tutorial.Follow this guide at your own risk. I am not responsible if you mess up your switch even more. This Tutorial has only been tested on a RCM Switch. This has not been tested on switch lite, oled or redbox mariko units with chips

The idea of this tutorial is to fix PikaBrick ergo PikaFix, however it can be used for any broken Prodinfo bricks.
This fix *** WILL NOT*** allow you to go online.
The provided files have already had Incognito pre-applied to them.
**METHOD 1 IS THE EASIEST**
Methods 2 and 3 will wipe your previous user partition.
Methods 2 and 3 are now deprecated


Requirements

To follow this tutorial you will need a few things:
ALL METHODS

Your bricked consoles biskeys - Obtain with lockpick_rcm
Your bricked RMC vulnerable switch
A computer/laptop
HacDiskMount or NXNandManager
Hekate Nyx
Atmosphere

Method 1
Prodinfo_Gen
Donor Prodinfo File (or use your own donor)

Methods 2 and 3 - DEPRECATED
PikaFix Pack from xbins or the mirror links (Mirror 1, Mirror 2, Mirror 3)
xbins file location - /SWITCH/PC based software/Utilities/pikabricker repair pack
My custom exosphere.bin file
NXNandManager (Method 2)
Etcher
TegraExplorer

This tutorial has three methods. Method 1 is recommended as Methods 2 and 3 are no longer updated.
Please follow your preferred method and following the appropriate booting section of the guide. I have written this guide as I was following the provided steps.

Before You Start


A few things before you start
  • Make a rawnand and boot0/1 backup, just in case, please? It's how you got into this mess in the first place.
  • Please read the guide carefully and if you have any questions ask them in the thread...

Repair Method 1DEPRECATED


  1. Repair Method 1: ProdInfo_Gen + HacDiskMount OR NXNANDMANAGER

    • Place the donor_prodinfo.bin on your microSD card in the switch folder (SD:/switch/donor_prodinfo.bin)
    • Put your switch in RCM
    • Inject prodinfo_gen.bin
    • Choose 'Build PRODINFO file from donor
    • Reboot to RCM
    • Inject the latest hekate (make sure you have all the hekate files on your microSD card)
    • Press Tools
    • Press USB Tools
    • Press SD Card
    • On your pc copy "generated_prodinfo_from_donor.bin" in the switch folder your desktop
    • Eject your microSD Card
    • Turn 'Read Only' to off
    • Press eMMC RAW GPP
    • On your PC open your Nand Manager of choice, either HacDiskMount or NXNandManager, I'll be using the latter
    • Configure your keys from the prod.keys you got from your bricked console
    • Open physical drive and choose your switch's emmc
    • Highlight prodinfo
    • press restore
    • choose the bin you copied to your dekstop
    • resave your keyset
    • Close
    • boot atmosphere

  2. Method 2Method 3


    1. Nand Repair Method 2: NXNandManger + HacDiskMount


      • Extract the contents of the PikaFix Pack archive to your desktop
      • Place the sept folder and hekate bootloader folder and the contents of the "to sd" folder in the PikaFix archive onto the root of your microSD card
      • Inject lockpick_rcm and run it to generate your prod.keys file
      • Place your switch into RCM and inject the hekate bin file
      • Navigate to Tools > USB Tools
      • Select "SD Card"
      • Open your mounted SD card and copy your prod.keys files from your sd card to your desktop
      • Eject your microsd card in windows
      • select "eMMC RAW GPP" (sysNand) - Set read only to off
      • Open NXNand Manager
      • Press Ctrl+D or press File > Open Drive
      • Choose your nand
      • Press Ctrl+K or Click Options > Configure Keyset
      • Choose your prod.keys you copied to your desktop
      • Press Save
      • You will notice it will say Bad Crypto and Keyset Needed, this is normal.
      1. Click Prodinfo then click the following Icon View attachment 235857
      2. Choose Prodinfo.bin from the files you extracted
      3. Press yes on the restore prompt
      4. Close the transfer box
      • Repeat Steps 1 - 4 for the ProdInfoF, Safe and System Partitions
      • Do the same restore process for the BPKG2 partitions
      • Close NXNandManager
      • Run HacDiskMount as an Administrator
      • Open your mounted drive
      • Double click on system, install the driver and mount the partition to a drive letter
      • Navigate to the save folder and delete everything EXCEPT 8000000000000120
      • Unmount the drive
      • Close HacDiskMount and open Etcher
      • Unmount "eMMC RAW GPP" and Mount "BOOT 0" - you may need to unplug the switch from the usb and replug it to continue
        DO NOT CLICK FORMAT - Just close the popup box(s)
      • Choose the boot0.bin file from the Nand files on your desktop
      • Choose your mounted boot0 drive
      • Flash it
      • Repeat for Boot1
      • Reboot to RCM
      • Launch tegra explorer.bin
      • Navigate to the "_FWGEN" folder and run the systemRestore.te script and follow the on screen prompts
      • Reboot back to RCM and relaunch tegra explorer
      • Navigate back to the "_FWGEN" folder and this time run the systemwipe.te script and follow the on screen instructions
      • Reboot back to rcm
      • Proceed to boot section of guide

    2. Nand Repair Method 3: HacDiskMount


      • Extract the contents of the PikaFix Pack archive to your desktop
      • Place the sept folder and hekate bootloader folder and the contents of the "to sd" folder in the PikaFix archive onto the root of your microSD card
      • Inject lockpick_rcm and run it to generate your prod.keys file
      • Place your switch into RCM and inject the hekate bin file
      • Navigate to Tools > USB Tools
      • Select "SD Card"
      • Open your mounted SD card and copy your prod.keys files from your sd card to your desktop
      • Eject your microsd card in windows
      • select "eMMC RAW GPP" (sysNand) - Set read only to off
      • Run HacDiskMount as an Administrator
      • Open your eMMC from physical drives
      • Open your prod.keys
      1. Double click Prodinfo
      2. Enter your biskeys
      3. Test them
      4. Save them
      5. Restore Prodinfo from the Prodinfo.bin file in Nand files on your desktop from the PikaFix files you extracted
      • Repeat steps 1-5 for ProdInfoF, Safe, and System Partitions
      • Double click on each of the BCPKG2 files and restore them from the provided files
      • Double click on system, install the driver and mount the partition to a drive letter
      • Navigate to the save folder and delete everything EXCEPT 8000000000000120
      • Unmount the drive
      • Close HacDiskMount and open Etcher
      • Unmount "eMMC RAW GPP" and Mount "BOOT 0" - you may need to unplug the switch from the usb and replug it to continue
        DO NOT CLICK FORMAT - Just close the popup box(s)
      • Choose the boot0.bin file from the Nand files on your desktop
      • Choose your mounted boot0 drive
      • Flash it
      • Repeat for Boot1
      • Reboot to RCM
      • Launch tegra explorer.bin
      • Navigate to the "_FWGEN" folder and run the systemRestore.te script and follow the on screen prompts
      • Reboot back to RCM and relaunch tegra explorer
      • Navigate back to the "_FWGEN" folder and this time run the systemwipe.te script and follow the on screen instructions
      • Reboot back to rcm
      • Proceed to boot section of guide


Booting Method 1

Download latest atmosphere and launch fusee.bin

Booting method 2 and 3


    • Remount the microSD Card with hekate
    • Copy my modified exosphere.bin to your atmosphere folder on your microSD card
    • For launching with Hekate add the following line to your hekate_ipl.ini
    'secmon=atmosphere/exosphere.bin'​

    [config]​
    autoboot=0​
    autoboot_list=0​
    bootwait=3​
    verification=2​
    backlight=100​
    autohosoff=1​
    autonogc=1​
    {-- Custom Firmwares --}​
    [HekAtmosphere]​
    fss0=atmosphere/package3​
    kip1patch=nosigchk​
    atmosphere=1​
    secmon=atmosphere/exosphere.bin​

    • For launching with Fusee-primary add the following lines to atmosphere/config/BCT.ini (UPDATE FOR NEW RELEASE)

      [stage2]
      exosphere = atmosphere/exosphere.bin
    BCT0​
    [stage1]​
    stage2_path = atmosphere/fusee-secondary.bin​
    stage2_mtc_path = atmosphere/fusee-mtc.bin​
    stage2_addr = 0xF0000000​
    stage2_entrypoint = 0xF0000000​
    [stage2]​
    exosphere = atmosphere/exosphere.bin​


  • Unmount your microSD card, and proceed to launch with your now working switch
Credits
SciresM and the ReSwitched team for Atmosphere
PabloZaiden for their deviceid exosphere builder
Rajkosto for HacDiskMount
Eliboa for NXNandManager
SuchMemeManySkill for eMMC Hacc Gen and TegraExplorer
CTCaer for Hekate
Shchmue for Lockpick_RCM
ScandalUK for Incognito_RCM
Anyone else who helped out on these projects
Linuxares for help with Method 2

Finally I would like to have a massive thanks to
Anonymous who donated their nand to me for experimenting with and saying it can be used publicly for this fix
 
Last edited by Adran_Marit,

zorusgb

Well-Known Member
Newcomer
Joined
Dec 10, 2021
Messages
48
Trophies
0
Age
49
XP
142
Country
Bulgaria
I'm trying to fix my unpatched switch after it just wouldn't wake up one day (never modded before). It looks like dead emmc. So I got a blank emmc and followed all 3 methods and read all the discussions. Everything seem to go well until the very last step (method 3), system wipe through tegra explorer where I get: User failed to mount!
The switch goes to black screen splash screen when I try to launch Atmosphere and have to hold the power down to turn it off.
I noticed that the pikafix pack doesn't contain USER image and the guides mention nothing about that partition. Is this on purpose or am I missing something? The new emmc has a user partition, but that only because I used gptrestore when it was blank.
It doesn't look like I have a functional USER partition; when I mount it in HacDiskMount windows is not seeing it. That king of explains the above. I either need a donor user.bin (or nand dump) or a tool to format it. Any ideas how to do that? The other partitions show as a FAT32, but I think this is because HacDiskMount translates it in a format Windows can operate with.
 

Attachments

  • Capture.PNG
    Capture.PNG
    8.9 KB · Views: 129

Adran_Marit

Walküre's Hacker
OP
Member
Joined
Oct 3, 2015
Messages
3,781
Trophies
1
Location
42*South
XP
4,557
Country
Australia
I'm trying to fix my unpatched switch after it just wouldn't wake up one day (never modded before). It looks like dead emmc. So I got a blank emmc and followed all 3 methods and read all the discussions. Everything seem to go well until the very last step (method 3), system wipe through tegra explorer where I get: User failed to mount!
The switch goes to black screen splash screen when I try to launch Atmosphere and have to hold the power down to turn it off.
I noticed that the pikafix pack doesn't contain USER image and the guides mention nothing about that partition. Is this on purpose or am I missing something? The new emmc has a user partition, but that only because I used gptrestore when it was blank.

In your case you would likely need to flash an entire rawnand image to your nand then apply the pikafix. The other likely thing is the partition data may be out of alignment.

I suggest you follow THIS GUIDE first, to build all the partitions you need, then proceed with method 1 of pikafix.

If you are still having trouble, please feel free to message or reply here and I'm happy to help when I can :)
 

zorusgb

Well-Known Member
Newcomer
Joined
Dec 10, 2021
Messages
48
Trophies
0
Age
49
XP
142
Country
Bulgaria
In your case you would likely need to flash an entire rawnand image to your nand then apply the pikafix. The other likely thing is the partition data may be out of alignment.

I suggest you follow THIS GUIDE first, to build all the partitions you need, then proceed with method 1 of pikafix.

If you are still having trouble, please feel free to message or reply here and I'm happy to help when I can :)
Thanks Adrian. I tried the guide you suggested; identical to your guide the restore script runs fine, but it doesn't seem to rectify the issue with the USER partition. Since I cant do a emmc dump I used the SYSTEM folder generated from OFW 12.0.2 (I have 15 burned fuses) through EmmcHaccGen using my keys. I guess you're omitting the USER.bin in your PikaFix pack because of the sheer size of a mostly empty file. I tried looking for a donor dump on the net, but no luck; does such thing even exist? Here is my emmc table if it can provide any clues what might be the problem.
 

Attachments

  • Capture.PNG
    Capture.PNG
    25.6 KB · Views: 110

Adran_Marit

Walküre's Hacker
OP
Member
Joined
Oct 3, 2015
Messages
3,781
Trophies
1
Location
42*South
XP
4,557
Country
Australia
Thanks Adrian. I tried the guide you suggested; identical to your guide the restore script runs fine, but it doesn't seem to rectify the issue with the USER partition. Since I cant do a emmc dump I used the SYSTEM folder generated from OFW 12.0.2 (I have 15 burned fuses) through EmmcHaccGen using my keys. I guess you're omitting the USER.bin in your PikaFix pack because of the sheer size of a mostly empty file. I tried looking for a donor dump on the net, but no luck; does such thing even exist? Here is my emmc table if it can provide any clues what might be the problem.

I'm not sure I feel like the offset is wrong, does the user partition mount at all if you try it ?
 

zorusgb

Well-Known Member
Newcomer
Joined
Dec 10, 2021
Messages
48
Trophies
0
Age
49
XP
142
Country
Bulgaria
I'm not sure I feel like the offset is wrong, does the user partition mount at all if you try it ?
As far as I can tell the offsets are OK; I found a reference of a "proper" partition table and the two match perfectly. One issue I noticed is that I cant encrypt/decrypt USER, I get Fail! Entropy:....Either because USER is messed up or my keys are bad.
BIS Keys 0-2 work fine though. If I'm not mistaken BIS Key 2 and 3 are supposed to be identical (they are for me) and if 2 works for SYSTEM, then it's not the keys. So back to the donor issue to fix the messed up USER. Did I stumble on a taboo request and that's why your pack doesn't contain a USER.bin?
I also tried following ewabc886 NAND rebuilding guide, but he also starts with a donor. I figure if PRODINFO can be anonymized, then USER should be no problem too (besides the size). Anyone knows if USER.bin donor can be found?
 

Attachments

  • Capture.PNG
    Capture.PNG
    1.8 KB · Views: 116

zorusgb

Well-Known Member
Newcomer
Joined
Dec 10, 2021
Messages
48
Trophies
0
Age
49
XP
142
Country
Bulgaria
As far as I can tell the offsets are OK; I found a reference of a "proper" partition table and the two match perfectly. One issue I noticed is that I cant encrypt/decrypt USER, I get Fail! Entropy:....Either because USER is messed up or my keys are bad.
BIS Keys 0-2 work fine though. If I'm not mistaken BIS Key 2 and 3 are supposed to be identical (they are for me) and if 2 works for SYSTEM, then it's not the keys. So back to the donor issue to fix the messed up USER. Did I stumble on a taboo request and that's why your pack doesn't contain a USER.bin?
I also tried following ewabc886 NAND rebuilding guide, but he also starts with a donor. I figure if PRODINFO can be anonymized, then USER should be no problem too (besides the size). Anyone knows if USER.bin donor can be found?
I think I finally managed to sort out the USER partition issue. I found a rawnand dump in the Unbrick_Your_Switch pack by mattytrog (much appreciated Matt!). Mounted the archive in HacDiskMount and extracted the USER partition using null keys. I then flashed it to my emmc using my keys and it worked; the partition mounts fine and the keys check out. The FWGEN scripts both completed w/o error too.

Now I need to figure out why I'm getting black screen after the Atmosphere splash screen. I used FW 12.0.2 for the nand rebuild which is the minimal for my fuse count (15), so it should work in theory, but I', new to the HB scene so it could be many other things. Any suggestions are welcome.
 

zorusgb

Well-Known Member
Newcomer
Joined
Dec 10, 2021
Messages
48
Trophies
0
Age
49
XP
142
Country
Bulgaria
I think I finally managed to sort out the USER partition issue. I found a rawnand dump in the Unbrick_Your_Switch pack by mattytrog (much appreciated Matt!). Mounted the archive in HacDiskMount and extracted the USER partition using null keys. I then flashed it to my emmc using my keys and it worked; the partition mounts fine and the keys check out. The FWGEN scripts both completed w/o error too.

Now I need to figure out why I'm getting black screen after the Atmosphere splash screen. I used FW 12.0.2 for the nand rebuild which is the minimal for my fuse count (15), so it should work in theory, but I', new to the HB scene so it could be many other things. Any suggestions are welcome.
If it helps, this is the message I get with newer versions of Atmosphere (pic). Older versions just end up with black screen, no message. There are some reports of this happening to other Switches, but none of the solutions seem to work.
 

Attachments

  • Capture.PNG
    Capture.PNG
    92.4 KB · Views: 92

Adran_Marit

Walküre's Hacker
OP
Member
Joined
Oct 3, 2015
Messages
3,781
Trophies
1
Location
42*South
XP
4,557
Country
Australia
If it helps, this is the message I get with newer versions of Atmosphere (pic). Older versions just end up with black screen, no message. There are some reports of this happening to other Switches, but none of the solutions seem to work.

okay cool we getting somewhere

A few questions

1) When following matty's tutorial did you resign the partitions with your keys?
2)You followed the previously linked tutorial for generating the firmware files?
3) since you got the user partition fixed did you follow this tutorial to generate a prod info (Method 1) and flash it?
4) Do you have a gamecard inserted?
 

zorusgb

Well-Known Member
Newcomer
Joined
Dec 10, 2021
Messages
48
Trophies
0
Age
49
XP
142
Country
Bulgaria
okay cool we getting somewhere

A few questions

1) When following matty's tutorial did you resign the partitions with your keys?
2)You followed the previously linked tutorial for generating the firmware files?
3) since you got the user partition fixed did you follow this tutorial to generate a prod info (Method 1) and flash it?
4) Do you have a gamecard inserted?
To quickly answer your questions:
1: I didn't follow his tutorial, just borrowed the USER part that was missing in the PikaFix. But yes, all entropies eventually passed.
2: Not just, but also repeated them from scratch. I'll explain in a new post.
3: As above in 2 (BTW, there is an error in the guide I believe)
4: Nope
 

umby24

New Member
Newbie
Joined
Dec 13, 2021
Messages
3
Trophies
0
Age
30
XP
24
Country
United States
Came to add; I'm in the same boat. eMMC chip died one day. Followed the rebuild your nand from scratch guides, and I get as far as having a nintendo switch logo appear, and then Atmosphere crashes. I've retried and retried many times now over the last 3 days;

Of interest to me is on the error screen, the general purpose registers from X0 -> X28 have no value at all.
Error code of 2162-0002 (0x4a2).
I've tried firmwares 13.1.0, 12.0.2, and the pikafix pack whatever that's on.
 

Adran_Marit

Walküre's Hacker
OP
Member
Joined
Oct 3, 2015
Messages
3,781
Trophies
1
Location
42*South
XP
4,557
Country
Australia
Came to add; I'm in the same boat. eMMC chip died one day. Followed the rebuild your nand from scratch guides, and I get as far as having a nintendo switch logo appear, and then Atmosphere crashes. I've retried and retried many times now over the last 3 days;

Of interest to me is on the error screen, the general purpose registers from X0 -> X28 have no value at all.
Error code of 2162-0002 (0x4a2).
I've tried firmwares 13.1.0, 12.0.2, and the pikafix pack whatever that's on.

Try method 1 in this post then try booting atmosphere again and let me know

To quickly answer your questions:
1: I didn't follow his tutorial, just borrowed the USER part that was missing in the PikaFix. But yes, all entropies eventually passed.
2: Not just, but also repeated them from scratch. I'll explain in a new post.
3: As above in 2 (BTW, there is an error in the guide I believe)
4: Nope

1) Entropies passing is good
2) Okay if all the firmware flashed properly that is also good.
3) If there is an error in this guide for flashing the prodinfo which is the guide I was referring to, please message me what you think it is. I'm sorry should have made that a bit clearer
4) Okay

As above, please try method 1 in this guide and let me know

Thanks
 

zorusgb

Well-Known Member
Newcomer
Joined
Dec 10, 2021
Messages
48
Trophies
0
Age
49
XP
142
Country
Bulgaria
To quickly answer your questions:
1: I didn't follow his tutorial, just borrowed the USER part that was missing in the PikaFix. But yes, all entropies eventually passed.
2: Not just, but also repeated them from scratch. I'll explain in a new post.
3: As above in 2 (BTW, there is an error in the guide I believe)
4: Nope
I shouldn't have called it error, it's an omission at most; let me explain.

First I started making sure PRODINFO is generated properly. This is probably where I was making the first mistake. What I didn't realize is that prodinfo_gen needs not only the donor prodinfo file, but also the keys dump. That's probably obvious and explained in the tool usage page, but got past a noob like me. The ewabc886 guide mentions this step; what's missing is that the keys dump needs to be renamed to donor. Perhaps for prodinfo from scratch it doesn't matter, but it did in my case as I wanted to follow the donor path in order to be able to use game cartridges. I was getting "can't parse keys file" error (which I dismissed the first time); the error went away after renaming the keys file to donor. I don't know if this makes any difference, but it's an observation I thought I should share.

Uploaded the now supposedly correct prodinfo, but still black screen after splash. Repeated all 3 guides for good measure (plus the ewabc886 one) and still no luck.

However, while playing with prodinfo_gen I noticed that the donor prodinfo was being identified as 10.2.0 and I was using 12.0.2 which is the lowest available for my fuse count. I went back and re-did the FW part in ewabc866 guide but using OFW 10.2.0 instead. Lo and behold, it booted this time!

Now, new issue😁
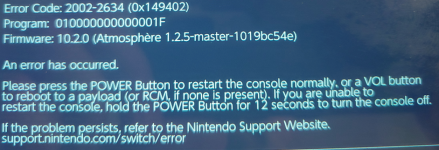
. The moment I insert a game cartridge the console crashes. I'll post a screenshot tonight. Made some progress though, so can't comlain.
 

umby24

New Member
Newbie
Joined
Dec 13, 2021
Messages
3
Trophies
0
Age
30
XP
24
Country
United States
Try method 1 in this post then try booting atmosphere again and let me know


1) Entropies passing is good
2) Okay if all the firmware flashed properly that is also good.
3) If there is an error in this guide for flashing the prodinfo which is the guide I was referring to, please message me what you think it is. I'm sorry should have made that a bit clearer
4) Okay

As above, please try method 1 in this guide and let me know

Thanks
WOMG it booted!
Redownloaded your donor prodinfo, followed the steps and boom, booted right away!
I could hug you
Thank you
 

zorusgb

Well-Known Member
Newcomer
Joined
Dec 10, 2021
Messages
48
Trophies
0
Age
49
XP
142
Country
Bulgaria
WOMG it booted!
Redownloaded your donor prodinfo, followed the steps and boom, booted right away!
I could hug you
Thank you
Nicely done umby24, congrats. Are you able to use game cartridges? I get this as soon as I put one in:
 

Attachments

  • Capture.PNG
    Capture.PNG
    678 KB · Views: 95

zorusgb

Well-Known Member
Newcomer
Joined
Dec 10, 2021
Messages
48
Trophies
0
Age
49
XP
142
Country
Bulgaria
Nicely done umby24, congrats. Are you able to use game cartridges? I get this as soon as I put one in:
Never mind, updated to 12.0.2 through daybreak and its all good. I suspect it was a mismatch between the FW revision and the card reader fuses. Men so much reading and learning to get to this point

Long story short, although it wasn't the goal of this guide it is possible to completely rebuild a switch emmc with just the tools and files that are readily available on the web.

Shoutout to Adrian, ewabc866, mattytrog and the countless others that made any of this possible.

Now to the next phase: try to recover the data of the busted emmc board; hundreds of hours of saves on that bastard:)
 

Adran_Marit

Walküre's Hacker
OP
Member
Joined
Oct 3, 2015
Messages
3,781
Trophies
1
Location
42*South
XP
4,557
Country
Australia
Never mind, updated to 12.0.2 through daybreak and its all good. I suspect it was a mismatch between the FW revision and the card reader fuses. Men so much reading and learning to get to this point

Long story short, although it wasn't the goal of this guide it is possible to completely rebuild a switch emmc with just the tools and files that are readily available on the web.

Shoutout to Adrian, ewabc866, mattytrog and the countless others that made any of this possible.

Now to the next phase: try to recover the data of the busted emmc board; hundreds of hours of saves on that bastard:)
Nice, pro tip. Make a complete nand backup at this point. Makes it easier for recovery now.

Good luck i suspect you'll need an external emmc reader at least
 

zorusgb

Well-Known Member
Newcomer
Joined
Dec 10, 2021
Messages
48
Trophies
0
Age
49
XP
142
Country
Bulgaria
Oh, I did that right away; learned that lesson the hard way.
I ordered both dongles, mmcblkNX and exploit.te; also got an used emmc module from ebay to practice on.
With the dead bugging method I won't have access to Boot0 and Boot1; is there system specific information or is it Prodinfo the important one?
Unless the emmc chip itself is dead I should be able to access everything but the boot partitions. My ultimate goal is to recover the system to stock if it's even possible with a substitute emmc board.
 

umby24

New Member
Newbie
Joined
Dec 13, 2021
Messages
3
Trophies
0
Age
30
XP
24
Country
United States
Nicely done umby24, congrats. Are you able to use game cartridges? I get this as soon as I put one in:
It appears during one of my teardowns of the system I broke the daughterboard or its ribbon cable or something, as the touch screen, card reader, and headphone jack are non-functional, so I can't test, sorry!
 

Adran_Marit

Walküre's Hacker
OP
Member
Joined
Oct 3, 2015
Messages
3,781
Trophies
1
Location
42*South
XP
4,557
Country
Australia
Oh, I did that right away; learned that lesson the hard way.
I ordered both dongles, mmcblkNX and exploit.te; also got an used emmc module from ebay to practice on.
With the dead bugging method I won't have access to Boot0 and Boot1; is there system specific information or is it Prodinfo the important one?
Unless the emmc chip itself is dead I should be able to access everything but the boot partitions. My ultimate goal is to recover the system to stock if it's even possible with a substitute emmc board.

mmcblknx will allow you access to boot partitions
as well as prodinfo and all the other ones

Possibly.
It appears during one of my teardowns of the system I broke the daughterboard or its ribbon cable or something, as the touch screen, card reader, and headphone jack are non-functional, so I can't test, sorry!
oof
 

Site & Scene News

Popular threads in this forum

General chit-chat
Help Users
    Xdqwerty @ Xdqwerty: @The Real Jdbye, there wasnt even a conversation in place